Graham Mayor
... helping to ease the lives of Microsoft Word users.
 |
 |
 |
Many people access the material from this web site daily. Most just take what they want and run. That's OK, provided they are not selling on the material as their own; however if your productivity gains from the material you have used, a donation from the money you have saved would help to ensure the continued availability of this resource. Click the appropriate button above to access PayPal.
Content Control Toolkit Add-in for the PC version of Word 2013 and later.
Working on templates for a private client which required extensive use of content controls, I soon realised that Microsoft doesn't make it easy to insert, edit and especially map content controls. A while back, in conjunction with Greg Maxey I produced a simplified version of his Content Control tools which can be found at Bookmark and Variables on this site and the more complex version is on his site at Content Control Tools.
Thanks too to Greg for making some valuable suggestions for inclusion and change and especially for the validation process he has provided.
This earlier version however was not that helpful in cutting down the number of steps needed to insert a content control, and in fact used the Word dialogs; so I created a simple tool that would insert the Text and Date controls I was working with and that made the job much easier.
The add-in featured here is based on that simple tool and features a variety of additional processes to edit content controls, that I have either had hanging around without a home to go to, or have created while working on client documents.
When installed in the Word startup folder, the add-in places two buttons on both the 'Insert' tab and the 'Developer' tab. 'Developer', as this is the logical place for the controls, but 'Insert' because I was working with bookmarks as well as content controls when I developed the processes and 'Insert' is where the bookmark insertion tool is found.
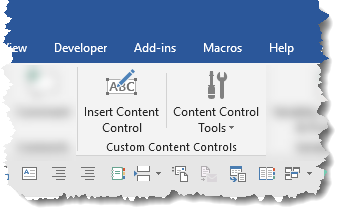
Insert Content Control
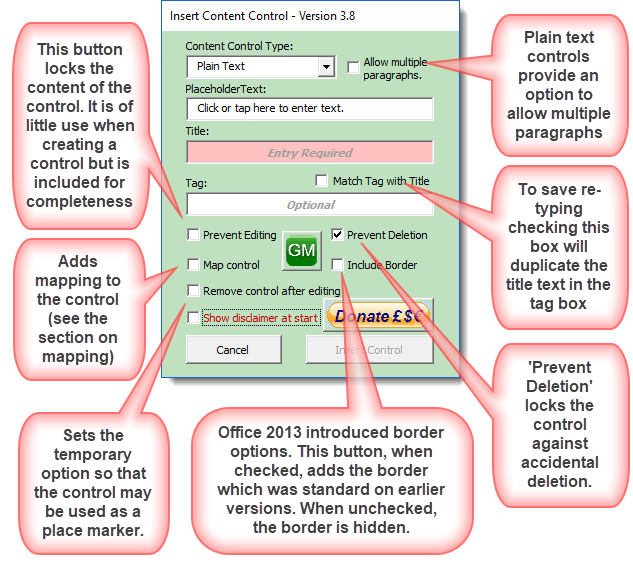
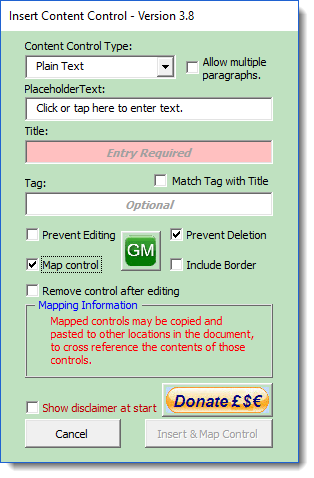
The primary option is that of inserting content controls, and the add-in presents a simple dialog with the main choices displayed. (It does not prevent users accessing the controls later using the built-in content control dialog).
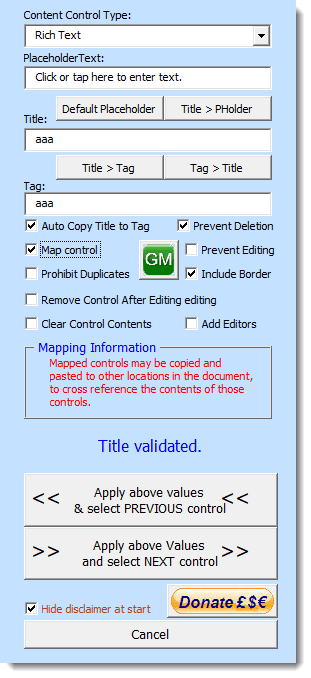
One function it provides, that Microsoft chose to make much more complicated than it needs to be for the type of use that most will need it for, is that of mapping controls.
Mapped controls may be repeated by simple cut and paste, and whatever you enter in one of the controls will be echoed in its duplicate. This is a very useful option that most users will not even be aware of, as Microsoft doesn't shout it from the rooftops - as it should, when it provides something that users might actually appreciate (more on mapped controls at the end of this page).
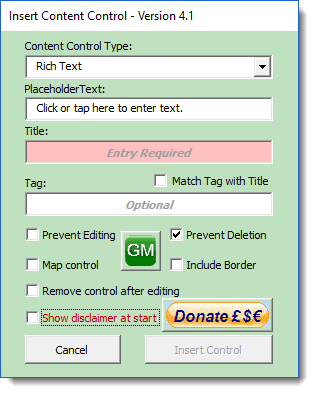
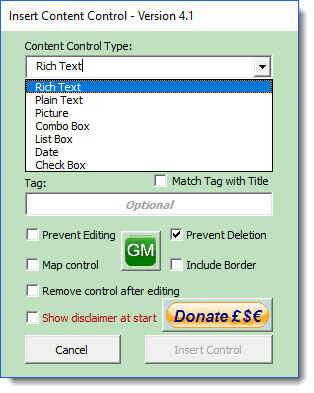
The dialog features a simple dropdown field from which the various types of control are selected. I deliberately avoided the Building Block and Group controls, and for those still using Word 2007, the 'Check Box' control is not an option (as it was introduced in Word 2010) and the 'Include Border' option is not available in Word 2007 and 2010 (as this was introduced in Word 2013).
The options that are available vary according to which type of control is selected.
Some of the functions of this add-in are not compatible with Word 2007 & 2010 and will cause those versions to crash..
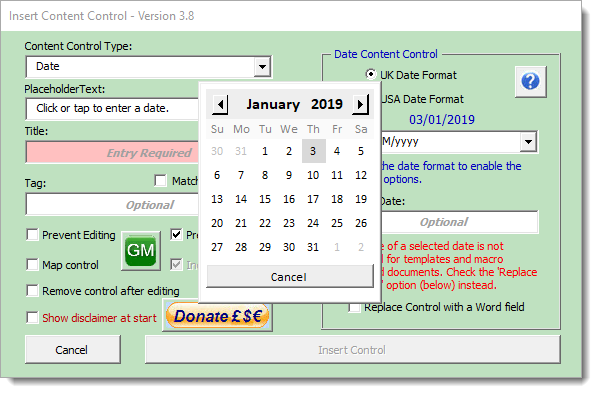
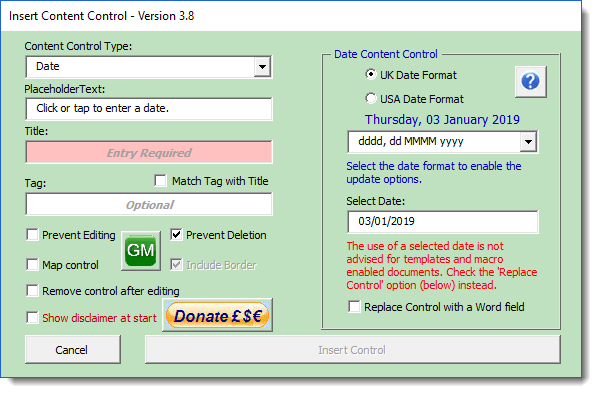
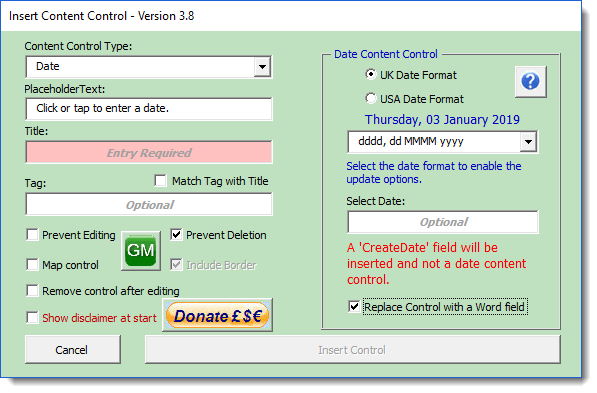
Date Control
The date control has a pop-out section from where you may select various options. I have chosen only to concentrate on US and UK format dates and those listed in the dropdown are the same as those Microsoft provides.
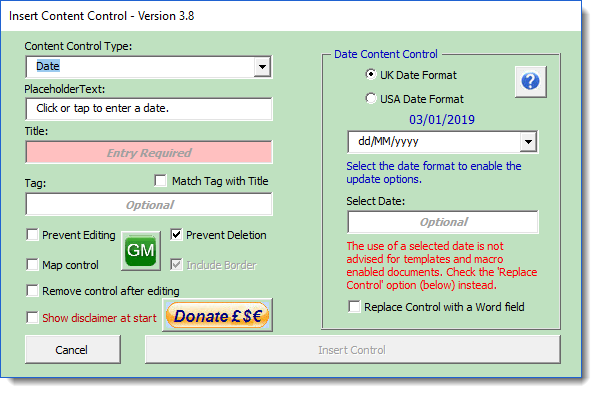
If you are using the tool to insert a date into a document, rather than a template, there is an option to select a date, which employs a variation of Trevor Eyre's handy VBA date picker.
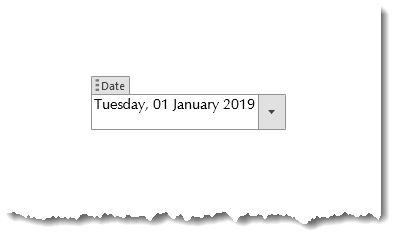
One very useful opportunity this provides is for inserting fixed dates in documents. Enter a date and check the 'Prevent Deletion' and 'Prevent Editing' options and your document will have a date that is not easily deleted or changed, without accessing the control's properties.

It is not normally recommended that a start date is included in a template or macro enabled document, so the date option is provided with a process that will instead insert a CreateDate field.
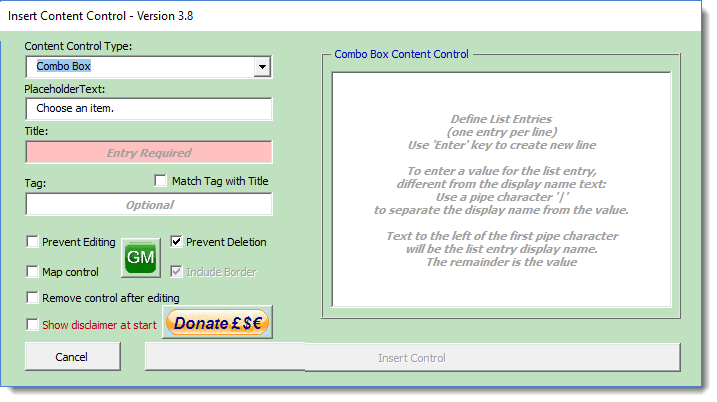
Combo and List Box Controls
The combo and list box options also include a pop out panel into which the list items can be entered.
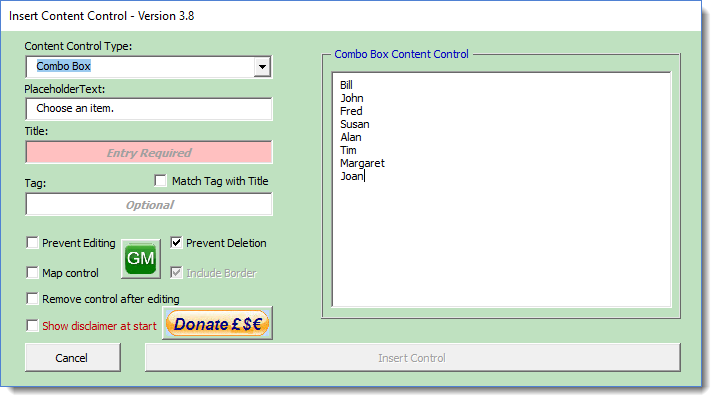

Employing a different 'value' property from the 'display name' property
One of the things you can do with list and combo box entries is provide separate texts for the display name text and value. By default the display name text and value text are the same, and so it was with the earlier versions of the add-in, however prompted by a question made in a Word forum, I have included the ability to have separate texts for display and value.
This works by inserting a pipe character to separate the display name text from the value text. Everything to the left of the first pipe character is the display name text. Everything to the right of that character (and that may include other pipe characters if required) is the value text.
To that end I have included the tip text as shown below.
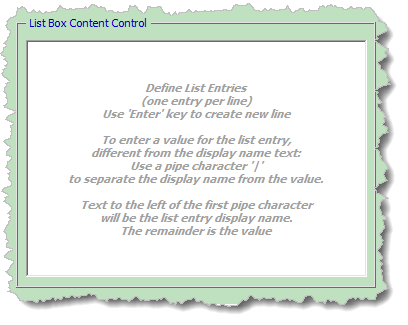
If you don't need separate values for the two texts, then simply enter the display text alone as described in the earlier part of the page.
The rest of the control insertion options are similar to the Plain Text control options, shown below
Select Content Control by Title/Tag
This is a relatively simple utility that allows a content control to be selected from a list of the controls in a document. This tool is simply an aid to identifying controls, particularly when developing of converting legacy forms top content controls, when there are large numbers of controls to consider.
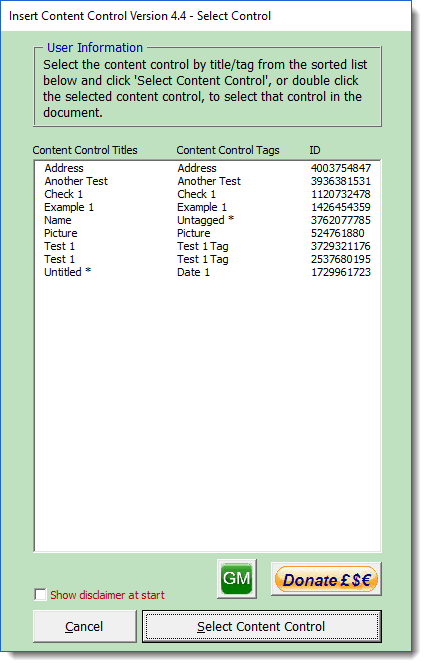
The list is sorted alphabetically in content control title order. Where there is no title or tag, the list is completed with 'Untitled *' or 'Untagged *' respectively to avoid having blank spaces in the list. The important part of the list is the ID number which Word provides when a content control is inserted. This number is used to select the content control in the document, as it is selected in the list (as confirmation that it is they control you are interested in) and subsequently when 'Select Content Control' is selected, or the list item is double clicked to close the form.
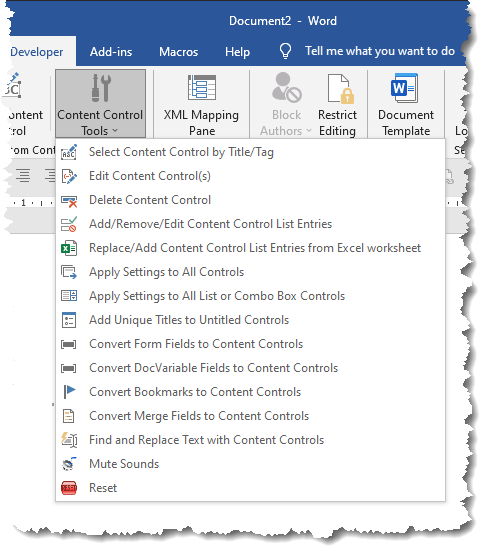
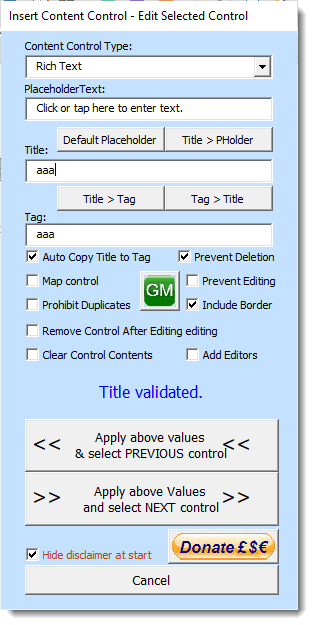
Edit Content Controls
This is a new option developed to use a similar interface to the Insert Control function, but with the ability to page through all the controls in a document and edit them, including changing from one type to another,
The dialog is similar to and works in the same way as the Insertion dialog featured above albeit with a few obvious differences. The most noticeable are the background colour and the two large buttons that apply the revised settings.
The other dialog functions are:
- Use default Placeholder text'
Changes the current placeholder text for the default value for the specific type of control. This is useful when a control is changed to a different type. - Auto Copy Title to Tag - similar in function to the
Match Tag with Title option on the Insert Control dialog
- Copy Title to Tab
Copies whatever is in the Title text box to the Tag text box. - Copy Tag to Title
The reverse of the previous option - copies the contents of the Tag text box to the Title text box. - Prohibit Duplicates
As its name suggests, when checked does not allow Control titles to be duplicated. Duplicated control titles/tags can be something of a pain when you wish to extract data from a form using content controls. - Add Editors
Editors mark editable areas of a document when used with read only protection. This option allows the addition or removal of editors from the selected content control, ideal when creating or editing protected forms. This option will work whether or not the form is protected.
- Validation text
The large font blue text below the check boxes indicates whether the control texts are valid. - Apply Above Rules' Buttons
This pair of buttons applies whatever values have been selected in the dialog and moves to the next or previous control as appropriate.
When moving through the controls using the 'Apply' buttons the code detects whether a control is mapped and disables the 'Map control' option.
The editor does not offer the option to remove the mapping. If you want to remove the mapping from the control use the 'Delete Content Control' option to delete the control and reinsert a control without the map option.
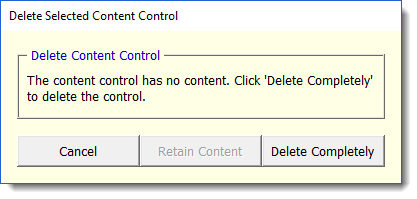
Delete Content Control
A simple function to delete the selected content control with the option to leave the value that it contained.

Add/Edit/Remove Content Control List Entries
The editor now also has the ability to separate the display name and value properties by using a pipe character to separate the two. Thus it is also now possible to add separate value properties to existing controls that don't have them.
Having inserted the control, you may want to sort the list, or you may have spelled a name incorrectly, or you may wish to remove a name from your list. Microsoft doesn't make this easy - but the second part of the add-in does.
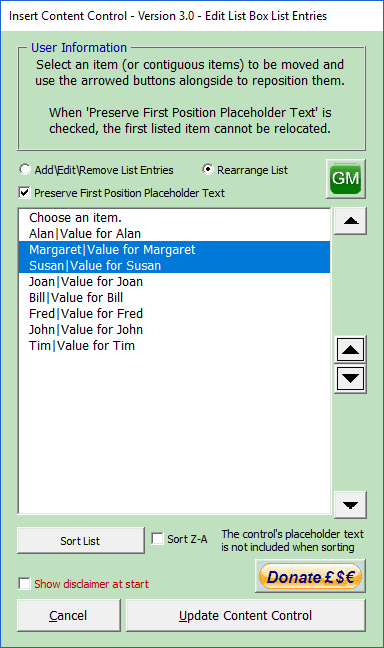
This time there is an entirely different dialog, which will appear if the Word cursor is in a combo or list box content control.
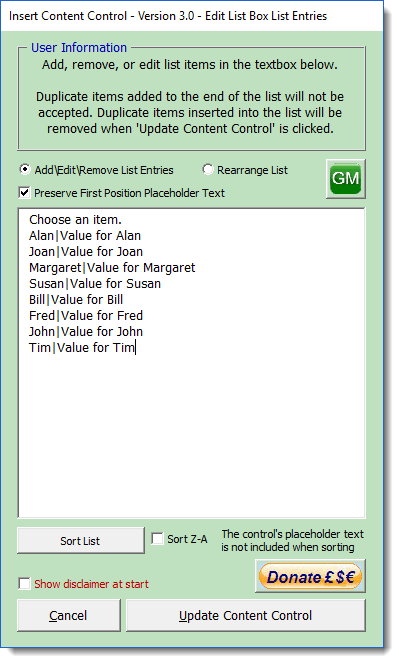
You will notice that the list now includes the placeholder text, and when sorting you would want to preserve that at the top of the list, so the process provides that option
From this dialog you can sort in A-Z or Z-A text order by clicking 'Sort List'.
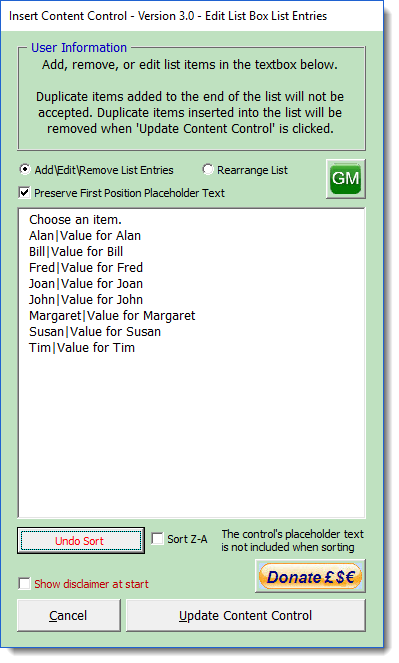
The Sort button has the option to undo the sort.
If you click the 'Rearrange List' radio button, Additional options are provided for shuffling the list items around, e.g. you may want to put the ladies names before those of the gentlemen. You can do that from here:
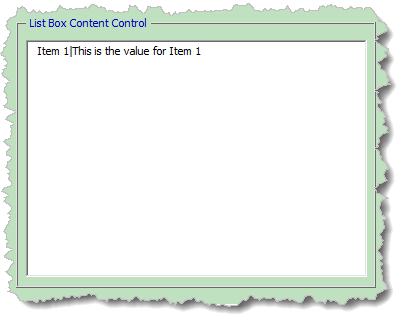
The list items above show the use of alternative values for the entries. If the value is the same as the entry, then you don't need to include the pipe character and the text that follows it. The placeholder item where present, does not have a separate value.
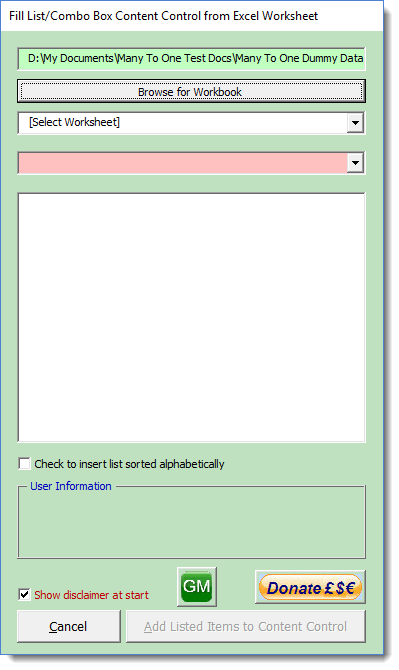
Replace/Add Content Control List Entries from Excel Worksheet
Users may wish to populate content control list or combo boxes with entries from an Excel worksheet, and while it is easy enough to select the items that you wish to include in the worksheet and paste them into the editor of the previous process, This process provides an interface to select a worksheet and include all of the items in a selected column of that worksheet.
Select a list or combo box and run the process, which displays the following dialog. Here I have used the worksheet associated with my Many To One mail merge examples

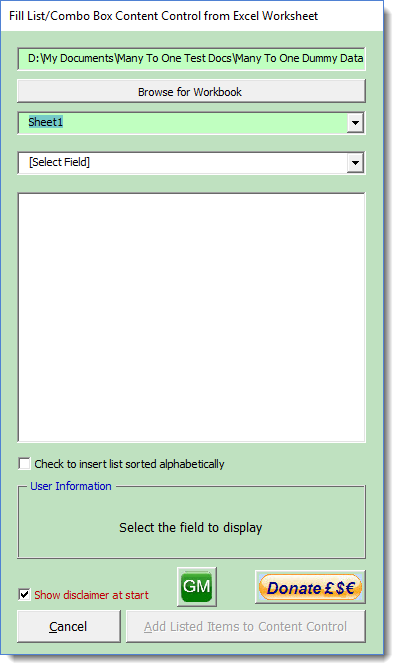
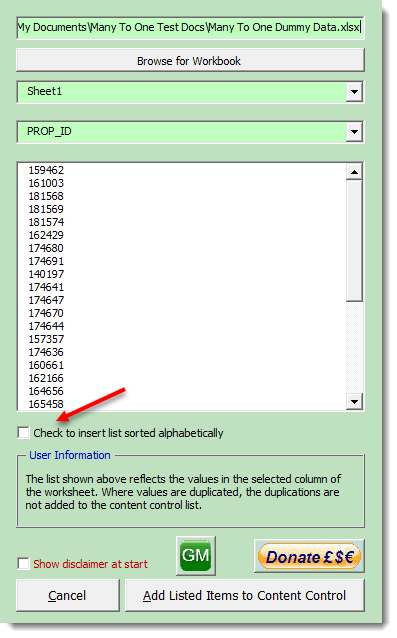
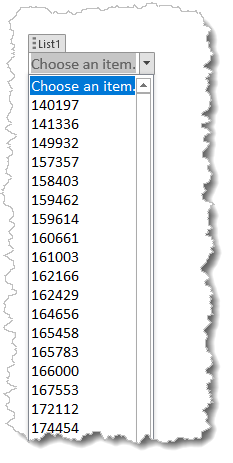
The list is inserted in the order it is presented in the worksheet and as shown in the illustration above; however, by checking the check box indicated the list is sorted alphabetically before insertion as shown below.
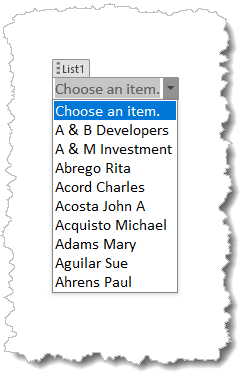
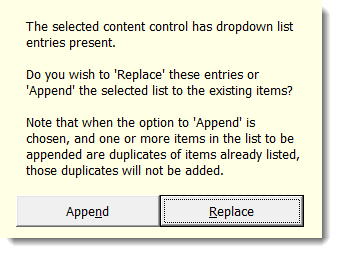
Where there are duplicated items in the Excel column e.g. as shown in the following illustration, regardless of where the duplicates appear in the list, the duplications are not added to the dropdown list.
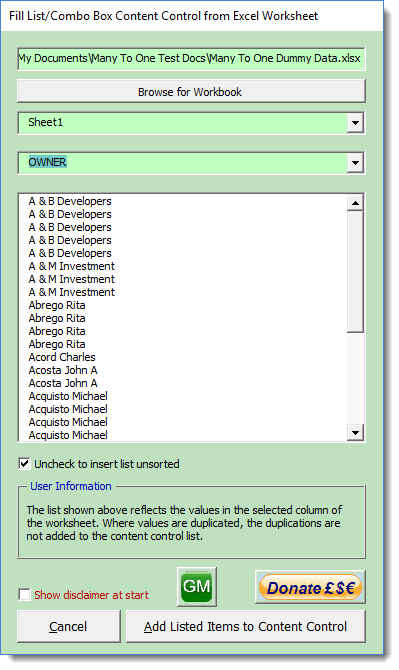
When using this process to add items to a control that already has items in its dropdown list, the process includes the option to append the list to the existing list, or to replace the existing list.
Lists added by this process may be edited using the 'Add/Edit/Remove Content Control List Entries' process described earlier, if required.
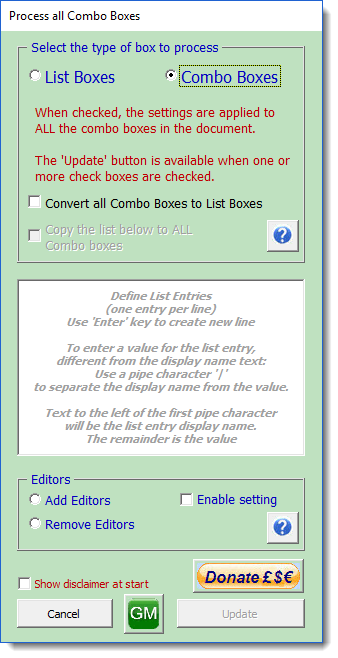
Apply Settings to All Controls
Sometimes it is useful to apply a range of settings to all the controls in a document The functions currently available are shown in the following dialog:
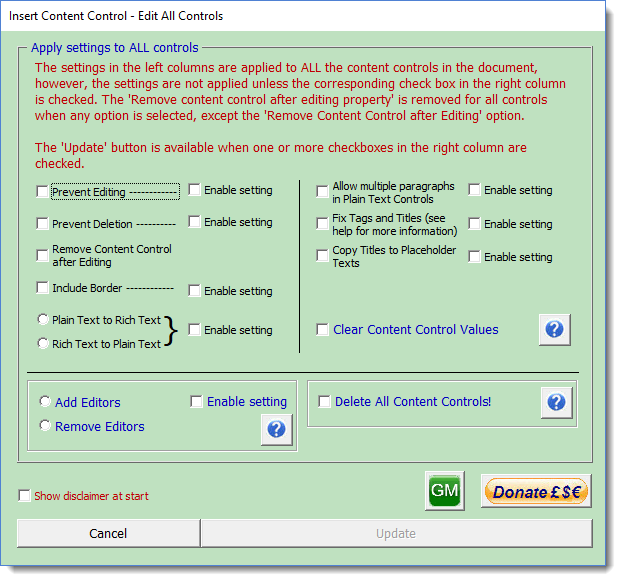

The check boxes and option buttons provide a number of settings which may be applied to all appropriate content controls in a document:
In all cases where there are pairs of
check boxes, the buttons in the right column must be set to
allow the setting from the left column.
Where properties are specific to particular types of control,
they are only applied to that type of control.
- Prevent Editing: When applied content control contents may be not be edited. The normal setting for this control is 'off'.
- 'Prevent Deletion': When applied content controls may not be deleted. Where applied to content controls in text boxes, frames or tables, those containers may not be moved or deleted, without unchecking the option.
- 'Remove Content Control After Editing': This option sets the content controls' temporary status, and the selection is applied in every case. Note that the temporary setting is removed from all fields, when ever the Update button is activated and this option is unchecked. Use the Edit Content Control option to restore the temporary option to only a selection of the controls as required.
- 'Include Border': Word versions before Word 2013 did not have the ability to have different border types around controls. By default a content control will have a border, however content controls inserted using this add-in may optionally be inserted with hidden borders
- 'Convert plain text controls to rich text controls' and
- 'Convert rich text controls to plain text controls' are mutually exclusive so are selected with option buttons, only one of which may be selected.
- Working in conjunction with 5 & 6 above, plain text controls may optionally include the setting to allow multiple lines of text in a control.
- 'Fix Tags and Titles': When applied, any content controls that have a tag, but no title or have a title but no tag, are updated to ensure that both title and tag are the same. Where there is neither title nor tag, the control title and tag is unchanged. To address this and check the settings in all the controls, you may use the 'Edit Control(s)' option from the add-in's ribbon menu.
- 'Copy Titles to Placeholder Texts': This replaces whatever has been set as the placeholder text, with the content control title. Where there is no title, the placeholder text remains unchanged. The add-in does not recall the placeholder texts that were originally applied when using this process, so reversing the option sets the default placeholder text for each type of content control.
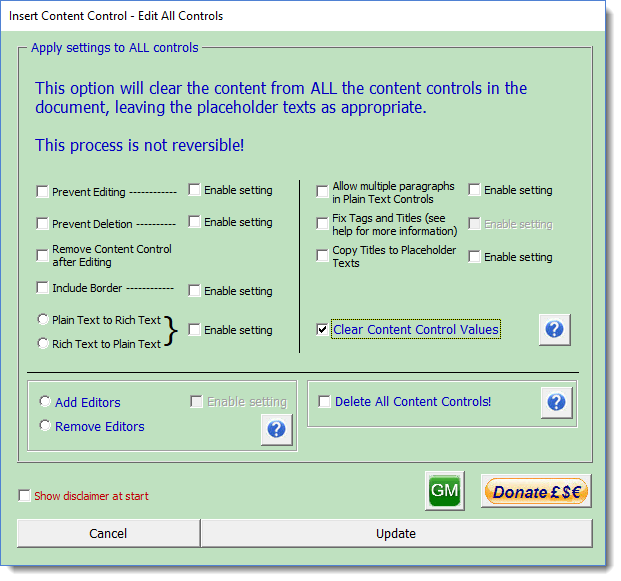
- 'Clear Content Control Values': When applied the contents or values of all the content controls are cleared. Check boxes are set to unchecked. List and combo boxes retain their lists, but are set to show their placeholder texts
- Add or Remove Editors: 'Editors' are used primarily when creating protected forms
in which only the content controls may be edited, in much the same way as
legacy form fields may be protected for filling in forms.
When editors are used to create such a form, the content controls are marked as areas to be edited, when used in conjunction with 'No Changes, Read Only' as the document protection method.
To protect the form (with or without a password) check the 'Lock Form' option which appears when the option to 'Add Editors' is selected. Editors are only added once so this option can be used to lock a form to which editors have already been applied.
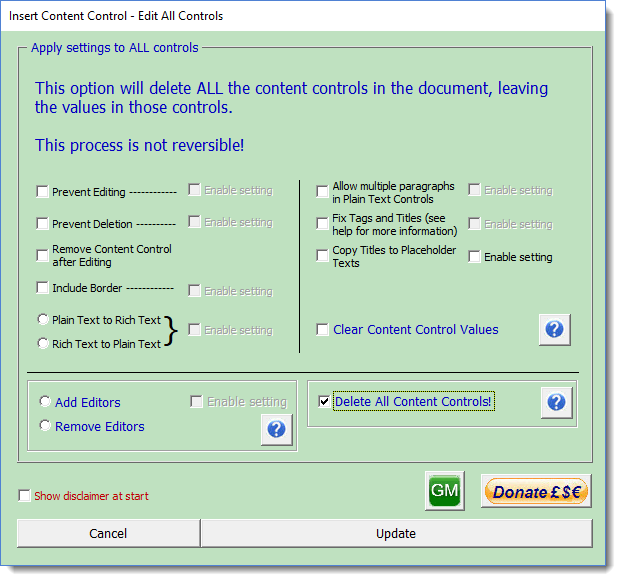
To unlock a protected form, select the option to 'Remove Editors' and check the 'Unlock Form' option which then becomes available. If the editors are not present this option will simply remove the protection. If a password has been applied, you will need to know that password, and enter it at the prompt, in order to use this option to unprotect the form. - 'Delete all content controls' is a destructive option, unconnected with the other setting options, which consequently are disabled when this option is applied.
With the exception of 5, 6 & 10, as many or as few of the selections may be applied at the same time, but (apart from 3 & 10) they are only applied when the associated 'Enable setting' check box is checked.
-----------------------------------------------------------------
Protection may also be added or removed from the form using Word's protection options from the Developer tab of the ribbon.
-----------------------------------------------------------------
The option, as its label suggests, deletes all the content controls in the current document, leaving the contents of those controls. The aim is to produce a finalized copy of the document, where no further editing to the control contents is possible e.g. certain legal documents may not be acceptable when they contain content controls.
Once applied and the document is saved, the controls are not
recoverable. If applied in error, despite the cautionary warning
that is displayed when used, close the document without saving
and re-open it again.
In order to ensure that the document may be recovered with its
edits intact, it is advisable to save the document BEFORE
deleting the controls."
Apply Settings to All List or Combo Box Controls
Similar in concept to the previous item, I was inspired to add this process by a forum post which concerned a form where hundreds of combo box controls had been inserted, where list boxes would have been more appropriate, and the lists themselves (common to all the controls) would have benefitted from some minor editing. Editing them one by one even using the facilities provided by this add-in would have taken forever, so I created this process to complete those tasks in a single operation.
The list and editors features are similar to those detailed in previous processes above, so I see no need to repeat them here. There is also context sensitive help available.

Add Unique Titles to Untitled Controls
It is advisable to title and tag content controls that are used for anything more adventurous than place markers. This process checks through all the controls in a document and gives a unique title to any that are both untitled and untagged, with the name based on the control type.
Controls that have tags can be titled using the 'Fix Tags and Titles' option in the previous menu item'
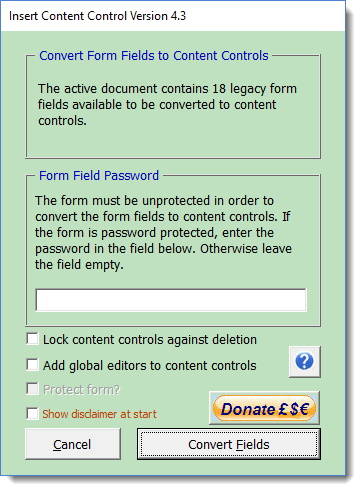
Convert Form Fields to Content Controls
This is a updated version of a function used in my extract data from forms add-in, and does what the title suggests. It converts legacy form fields (for which you will need the password, if password protected for forms) to content controls. This is just an aid to converting older legacy forms to use content controls, which have distinct advantages when it comes to extracting and logging data.
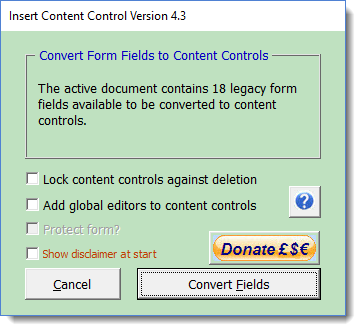
A form requires the user to input information in the spaces provided, and not be able to alter other content or the form layout.
There are a number of ways that you can achieve this with content control forms.
- Continue using the protection method 'filling in forms.'
- Use group content controls.
- Use a grouping rich text content control.
- Use 'Restrict Editing (No Changes - Read Only) with exceptions
(recommended)'.
The recommended method requires the content controls used for form data fields to be flagged as editable regions, before applying the editing restrictions. Using 'Add global editors to content controls' performs this step automatically as the formfields are converted to content controls.
When 'Add global editors to content controls' is checked an option to protect the form is enabled, which applies 'Restrict Editing (No Changes - Read Only)' protection, using the original password if set.
Convert Bookmarks to Content Controls
This process does as its caption suggests and replaces bookmarked texts with content controls.
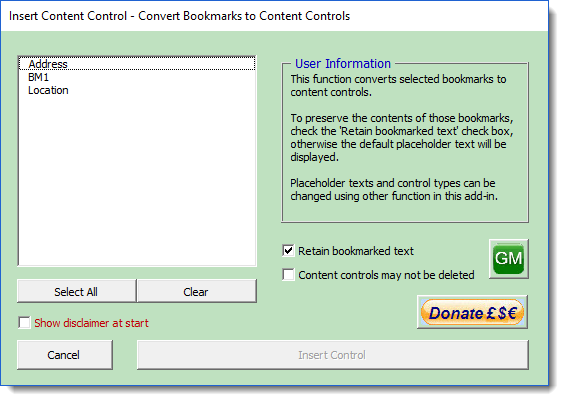
Bookmarks (and content controls for that matter) may be nested i.e. one bookmark may be contained within another. In this process I have chosen (for the present) to identify when there are nested bookmarks so that the nesting may be addressed before the bookmarks are processed.
The userform, shown above, lists the available bookmarks in the document and only those selected in the list box are processed.
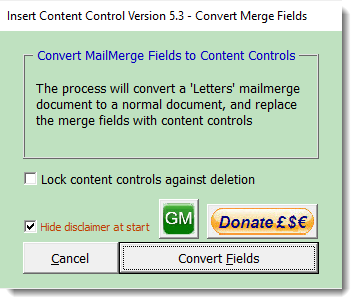
Convert Mailmerge fields to Content Controls
This function is included, as much for my own use as anything, to convert mailmerge fields in a 'Letters' merge document to content controls.
The process uses a simple dialog, from which a user can select whether the content controls should be locked against deletion.
Find and Replace Text with Content Controls (Word 2013 and later only)
A chance remark in a Word forum suggested that it might be useful to be able to search a document for a word or phrase and replace all instances of that word or phrase with content controls.
This function enables each occurrence of a selection of words or phrases, stored in a text file created by the process and selected from the userform list box shown below, to be replaced in the current document with a content control.
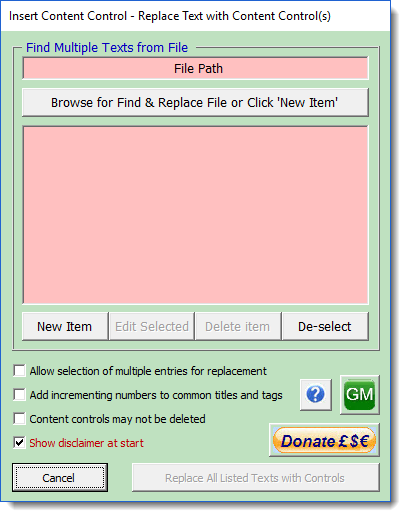
When run for the first time, the dialog shown above is displayed from which you may select an existing compatible text file or by clicking 'New Item' you may create a compatible text file. Thus you can create different lists for different document types and select them as required.
Clicking 'New Item' changes the layout of the Userform to prompt for a file path and file name for the new text file.
The two dialog boxes shown in pink colour are error trapped. The path may only be selected using the browse button beneath. The file name blocks the insertion of illegal filename characters and automatically adds the extension ".ini" to the filename when the new file is created. It does not allow the period character to be used in the dialog box.
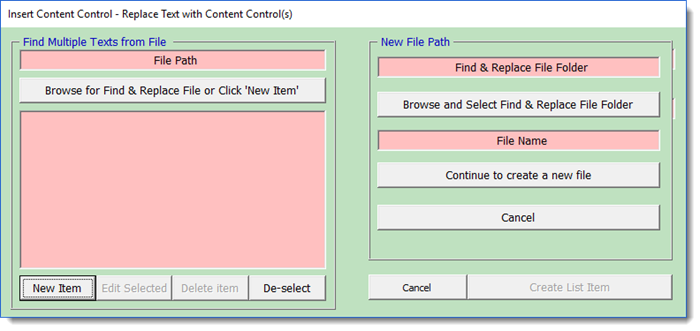
The new file creation warns when overwriting an existing file of the same name is likely to occur.
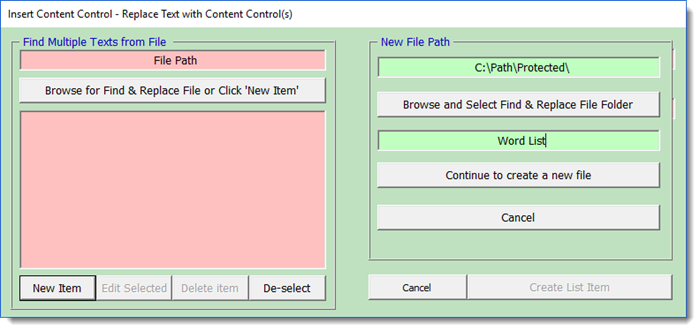
Click 'Continue to create a new file' and the right side of the dialog changes to allow you to add the first word or phrase to the file.
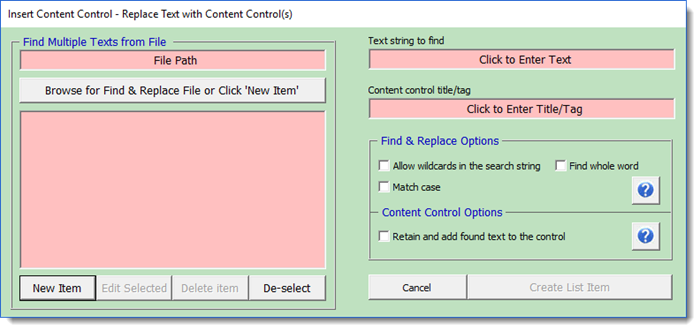
The dialog requires that you enter the word or phrase to search for (which can include Word wildcard characters) and a title for the control which will also be used to tag the control. When both fields are selected, the 'Create List Item' button become available. However there are other options associated with the search and replacement which may be selected. In particular, if wildcards are used in the search string, then you must check the 'Allow wildcards in the search string' option, or the process will search for the literal string.
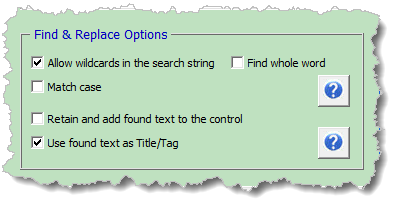
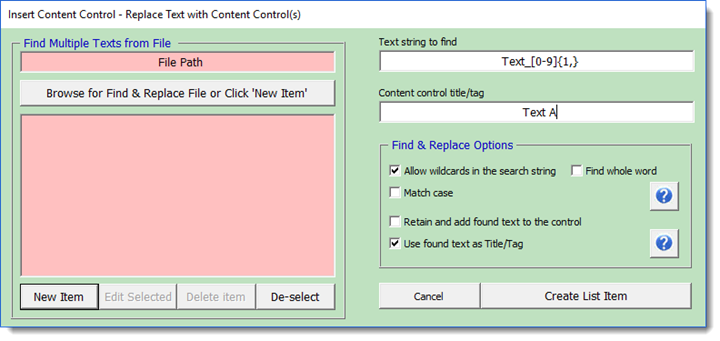
If the 'Retain and add found text to the control' is checked, the found text in the document will be added to the content control range for the selected search item. If it is unchecked, the found text is deleted and the control will display the default placeholder text.
Note that, at this stage, the left side of the dialog still shows that no file has yet been created. This changes when 'Create List Item' is clicked.
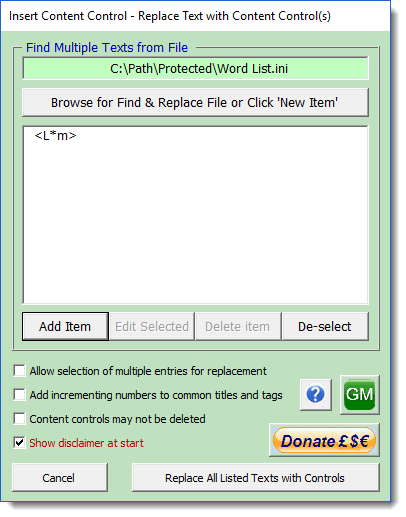
The dialog reverts to its original size and the newly created file is a loaded as shown above.
You may use the 'Add Item' button to add as many texts as you wish to the list.
The list is multi-functional. By default only one listed item may be selected at a time. Selection of an item enables the 'Edit Selected' and 'Delete Item' buttons, which, as their names suggest, allow the selected item to be edited or deleted.
If the 'Allow selection of multiple entries for replacement' check box is selected, more than one list item may be selected, however then the 'Edit Selected' and 'Delete Item' buttons are not available for use.
All content controls created by this process are titled and and tagged. As content control titles and tags may be duplicated, the default setting is to duplicate the titles and tags where more than one replacement is made for the same text.
By checking the 'Add incrementing numbers to common titles and tags' check box, numbers are added to duplicated titles and tags to make the titles and tags unique. This setting is retained between uses, until it is changed again.
The final option that may be selected is 'Content controls may not be deleted' which, as its caption suggests, adds to option to lock the controls against deletion. This setting is retained between uses, until it is changed again.
If one or more items is selected in the list, only the selected items are processed to create controls. If none of the items in the list is selected then ALL the items in the list are processed.
All the settings related to the controls may be changed using other functions in this add-in as required.
Reset
Last, and definitely least, is an option to remove the pieces of data used by the add-in that are stored in the registry.
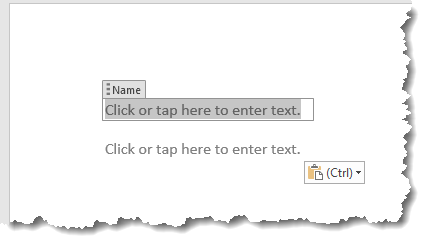
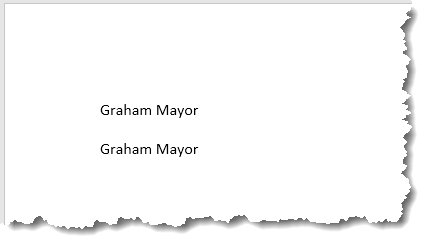
Mapped Controls
As mentioned earlier, the add-in provides an option to map add-in controls to the XML code of the document. The most common use of that is to enable content controls to be copied and pasted to provide duplicated entries elsewhere in a document. You can copy and paste e.g. a field containing a date or a name and that name can be reproduced elsewhere in the document by entering a value in any one of the duplicates:
 Click here to download the add-in
Insert Content Controls
Although content controls have been around for some considerable time, and my good friend Greg Maxey has been singing their praises and working with them, I am something of a late convert to their charms.
However that doesn't mean I have unbridled enthusiasm for the rather poor user interface that Microsoft offers by default.
The add-in featured here aims to improve that and adds a variety of tools to aid with editing controls to get the best from them.