Graham Mayor
... helping to ease the lives of Microsoft Word users.
 |
 |
 |
Many people access the material from this web site daily. Most just take what they want and run. That's OK, provided they are not selling on the material as their own; however if your productivity gains from the material you have used, a donation from the money you have saved would help to ensure the continued availability of this resource. Click the appropriate button above to access PayPal.
Convert Labels into Mail Merge Data File
See also my Labels to Excel Worksheet add-in
The company addresses used in this example, were taken from an old sample mailing list and may not reflect the current addresses of the companies concerned.
Convert the table to text
If you have more than one page of mailing labels in a document, it becomes difficult to maintain. The labels should be converted to a mail merge data source which can be merged to create a new label document.
In the following examples I have toggled-on the formatting information (CTRL+SHIFT+8 - or click the ¶ button on the Home tab of the Word ribbon) to demonstrate more clearly what is happening.
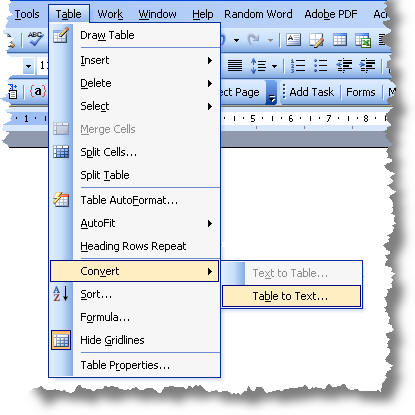
The first step is to extract the addresses by converting the table to text. In Word versions to 2003, click in the table and from the Table menu select Convert > Table to Text.
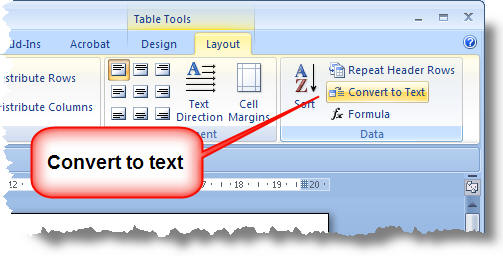
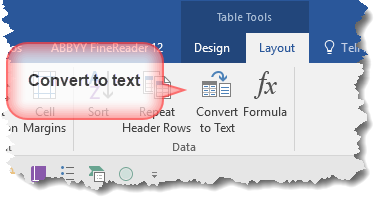
In Word 2007/2016 select the table then click Convert to Text on the Data section of the Layout Tab of the ribbon. The button positions vary with version, but the command is at the right hand side of the ribbon.
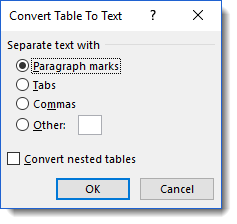
Using paragraph marks as record separators (see above), the result should appear like the first of the two examples below.
If, like the
right column example, it has the
 marks that indicate 'soft returns' against some of the address lines,
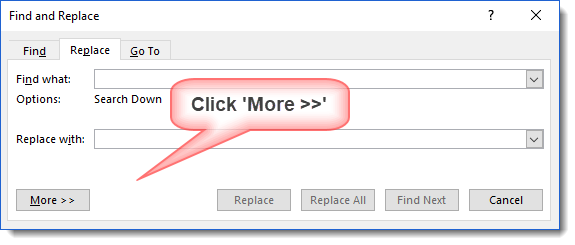
then you must use the replace function to replace ^l (lower case L - which represents
) with ^p (which represents ¶), to produce a result similar to that of the left column.
marks that indicate 'soft returns' against some of the address lines,
then you must use the replace function to replace ^l (lower case L - which represents
) with ^p (which represents ¶), to produce a result similar to that of the left column.
With label documents spanning several pages, it will probably be necessary to extract each page separately.

If each label had the same number of address lines, you could simply convert back to a table now, but they rarely do, so we now need a few more steps to complete the process. First step is to insert a marker that will hold the ends of each address. Each address is terminated by (at least) a double paragraph mark, so we can run a wildcard search to replace that double paragraph mark with a random and unique string of characters to produce the result below. On reflection, '@' was not the most ideal choice as it is a reserved character in searches, but we can work round that one.
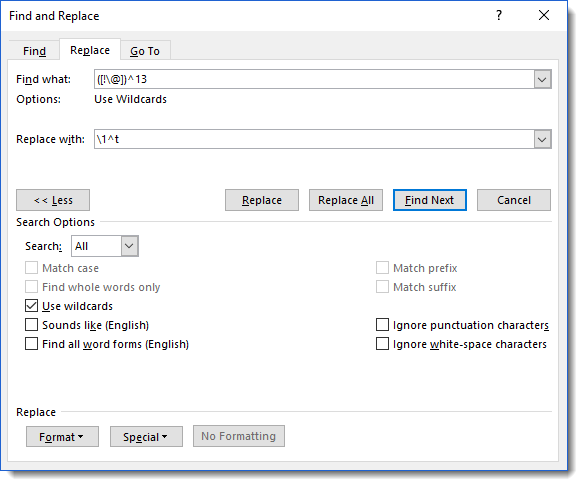
To search for a paragraph mark in a wildcard search, you must enter ^13 and not ^p in the 'Find what' string. The 'Replace with' string should, however, use ^p.
For more information on wildcard searching in Word see https://www.gmayor.com/replace_using_wildcards.htm
Next step is to swap those paragraph marks for tabs, to put each record on its own line. The search string looks for each paragraph mark and the character preceding it, but *not* characters preceded by @. The replacement string restores the preceding character and adds a tab in place of the paragraph mark.
The result is as follows:

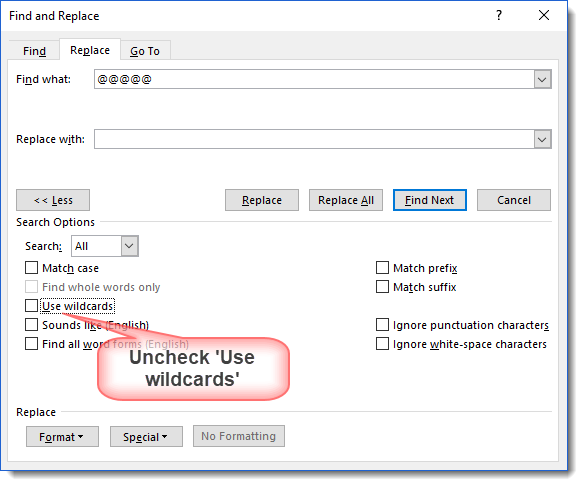
Next step is to lose the marker. Use a simple search, without the wildcard option, to replace the marker with nothing:
If you wish to sort the list into alphabetical order, you can do so now, or later when you have converted the list to a table.
You can now select the list and again from the Word 2003 Table menu, convert the selected text back to a table.

In Word 2007/2016 the convert text to table command can be found on the Insert Tab of the ribbon after clicking Table:
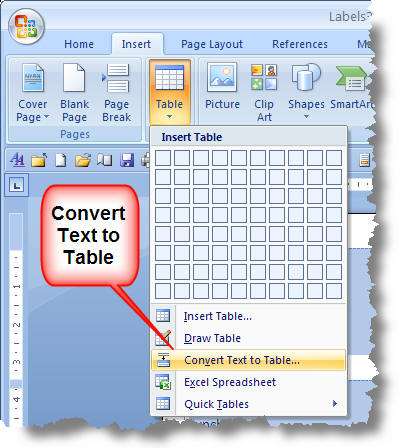
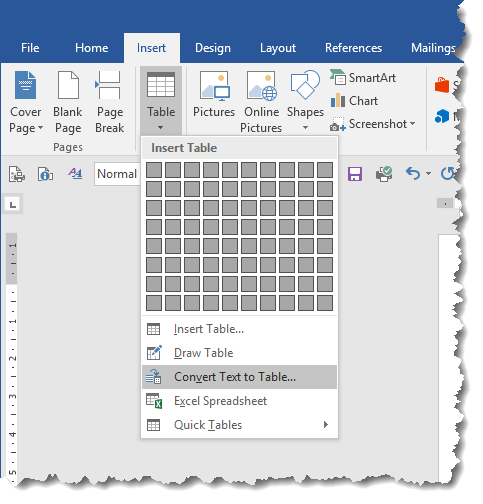
Thereafter whichever Word version you use the dialogs are similar.

Add a title row at the top of the table. The names are not critical, just make them memorable and unique.
Because the original labels did not have a fixed number of lines, the different parts of the address do not line up vertically. This should not matter when you come to merge the addresses into the new label document. Simply include all the fields on the label.
Save the finished table and you have a data source that is easier to maintain and which Word can use to create a new label merge.
Better still copy the table to an Excel worksheet for even more versatility.

Process as above using a macro:
Below is a macro based which adopts a different approach and which includes a few corrections for matters that might pop up along the way, then saves the results as a sorted data source. The macro has been tested on a variety of (but not all possible) label layouts in both Word 2003 and Word 2007, so please test it on a COPY of your label document.
Dim oDoc As Document, oNewDoc As Document
Dim oSection As Section
Dim oTable As Table
Dim ocell As Cell
Dim oPara As Paragraph
Dim oRng As Range
'The process could take a while, so warn the user
MsgBox "With a large label file, this macro will take a long time" & vbCr & _
"to run. Please wait until the task completed message is displayed", _
vbInformation, "Labels to Data"
'Turn off screen updating
Application.ScreenUpdating = False
Set oDoc = ActiveDocument
'Create a new document to take the data
Set oNewDoc = Documents.Add
'Check each table in each section of the document
For Each oSection In oDoc.Sections
For Each oTable In oSection.Range.Tables
For Each ocell In oTable.Range.Cells
Set oRng = ocell.Range
oRng.End = oRng.End - 1
'Replace any line breaks in the cell with paragraph breaks
oRng = Replace(oRng, Chr(11), Chr(13))
'Replace the paragraph breaks with a field end marker '|'
oRng = Replace(oRng, Chr(13), Chr(124))
'Copy the range to the end of the new document
oNewDoc.Range.InsertAfter oRng & vbCr
Next ocell 'and process the next cell
Next oTable
Next oSection
'We have finished with the label document so close
'without saving
oDoc.Close wdDoNotSaveChanges
'Check each paragraph in the new document
For Each oPara In oNewDoc.Paragraphs
'Delete any short paragraphs
If Len(oPara.Range) < 3 Then
oPara.Range.Delete
End If
'If the paragraph begins with the chosen field end character '|'
'Delete the character
If oPara.Range.Characters.First = Chr(124) Then
oPara.Range.Characters.First.Delete
End If
Next oPara
'Sort the data into alphabetical order
oNewDoc.Range.Sort
'Remove any superfluous spaces and field end characters
'that may be present at the end of each paragraph
Selection.HomeKey wdStory
With Selection.Find
.ClearFormatting
.Replacement.ClearFormatting
.Text = "[| ]{1,}^13"
.Replacement.Text = "^p"
.Forward = True
.Wrap = wdFindContinue
.Format = False
.MatchCase = False
.MatchWholeWord = False
.MatchAllWordForms = False
.MatchSoundsLike = False
.MatchWildcards = True
.Execute Replace:=wdReplaceAll
End With
'Convert the text to a table
oNewDoc.Range.ConvertToTable Chr(124)
'Add a header row to the table
oNewDoc.Tables(1).Rows(1).Select
Selection.InsertRowsAbove NumRows:=1
'Add field names to the header row
oNewDoc.Tables(1).Cell(1, 1).Range.Text = "Name"
For i = 2 To oNewDoc.Tables(1).Columns.Count
oNewDoc.Tables(1).Cell(1, i).Range.Text = "Address" & i
Next i
'Restore screen updating
Application.ScreenUpdating = True
'Job done, so tell the user
MsgBox "Data complete - be sure to check for duplicate entries", _
vbInformation, "Labels to Data"
End Sub
If you don't know what to do with the macro
code see Installing a macro from a listing
For those uncomfortable with VBA programming - See also my
Labels to Excel Worksheet
add-in
Labels to mail merge
Before discovering the pleasures of mail merge, it is not unreasonable to type addresses into mailing labels as in the first illustration alongside. Such a document is however difficult to manage, should you wish to add further addresses, and the benefits of mail merge quickly become apparent - but maybe not if you have to retype all those addresses.