Graham Mayor
... helping to ease the lives of Microsoft Word users.
 |
 |
 |
Many people access the material from this web site daily. Most just take what they want and run. That's OK, provided they are not selling on the material as their own; however if your productivity gains from the material you have used, a donation from the money you have saved would help to ensure the continued availability of this resource. Click the appropriate button above to access PayPal.
Print to a specific printer
Word will normally print to the default Windows printer, though you can set an alternative 'active printer' which will remain the printer Word prints to for the current session, or until changed to another. Where you have more than one printer - e.g. a laser printer for draft work, a colour printer for photographs, or maybe a fax driver - and you regularly switch between them; you can lose track of which printer the document will be sent to.
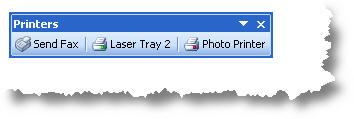
You can get around this by creating a 'printers' toolbar with buttons to call a macro, similar to that shown below, for each printer. Clearly each macro will have to have a unique name.
For Office 2007 and later you could add the buttons to the QAT (Quick Access Toolbar) or to a ribbon tab.
The macros work by saving the current active printer data, switching the active printer to that required, printing the document, then restoring the saved active printer data. Save the following macro in the document's template (or in the normal template.)
See also the companion web page which demonstrates the storage of the printer name with the document and offers the possibility of printing to that stored named printer.
The Macro Code
Dim sPrinter As String
With Dialogs(wdDialogFilePrintSetup)
sPrinter = .Printer
.Printer = "Put the name of the required printer here"
.DoNotSetAsSysDefault = True
.Execute
Application.PrintOut FileName:=""
.Printer = sPrinter
.Execute
End With
End Sub
Print from specific trays
If the printer has switchable trays, and you always wish to print from a specific tray, then the code may be modified slightly to select the required option. There is however an issue with using the tray assignments by name. If an error occurs when setting the option Word 2003 crashes and Word 2007 ignores the assignment.
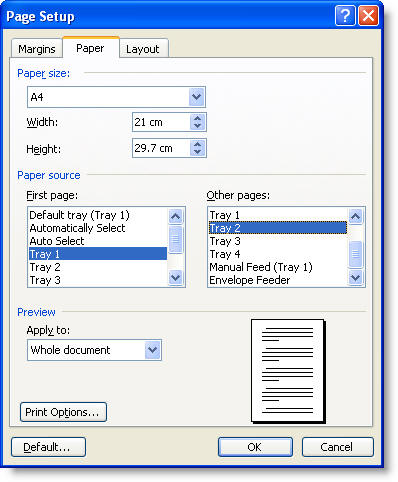
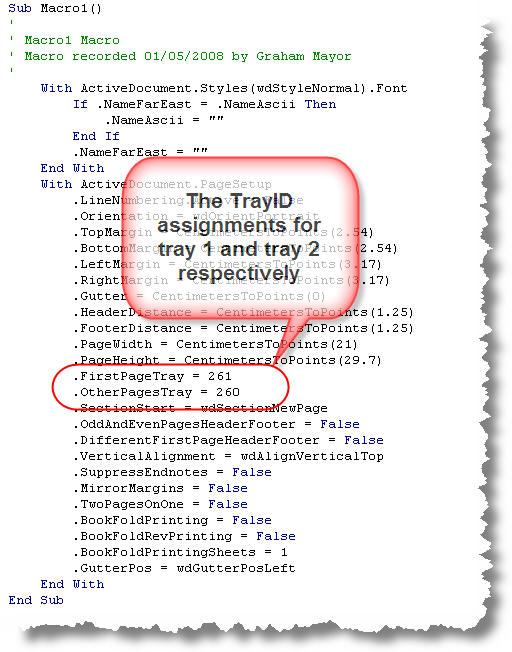
To ensure that this works correctly, it is much better to use the DefaultTrayID number. If you don't know the Tray ID numbers for your printer (and why should you) ensure that Word is configured to use the printer in question, then record a macro setting the Page Setup including the required tray assignments. In the illustration below I have chosen Trays 1 and 2.
This will produce a macro listing as follows:
Different printers have different tray IDs, do not rely on the ID numbers shown in the examples working in every case. Use the method above to check the ID codes for your printer.
Dim sCurrentPrinter As String
Dim sTray As Long
sCurrentPrinter = ActivePrinter
sTray = Options.DefaultTrayID
With Dialogs(wdDialogFilePrintSetup)
sCurrentPrinter = .Printer
.Printer = "Put the name of the required printer here"
.DoNotSetAsSysDefault = True
.Execute
Options.DefaultTrayID = "Set the trayID option here "
Application.PrintOut FileName:=""
Options.DefaultTrayID = sTray
.Printer = sCurrentPrinter
.Execute
End With
End Sub
Examples
To demonstrate, I have chosen a couple of real world examples, using Windows Fax and an HP 4050 postscript printer.
Dim sCurrentPrinter As String
On Cancel GoTo Cancelled:
sCurrentPrinter = ActivePrinter
ActivePrinter = "Fax"
Application.PrintOut FileName:=""
Cancelled:
ActivePrinter = sCurrentPrinter
End Sub
Dim sCurrentPrinter As String
Dim sTray As Long
sCurrentPrinter = ActivePrinter
sTray = Options.DefaultTrayID
ActivePrinter = "HP LaserJet 4050 Series PS"
With Options
.DefaultTrayID = 260
End With
Application.PrintOut FileName:=""
With Options
.DefaultTrayID = sTray
End With
ActivePrinter = sCurrentPrinter
End Sub
Print to an alternative printer, whilst displaying print dialog
The previous examples simply swap the printer and print the document without user interference, but you may wish to display the print dialog box to set print options for the current task. This requires a slightly different approach.
Dim sPrinter As String
With Dialogs(wdDialogFilePrintSetup)
sPrinter = .Printer
.Printer = "HP
LaserJet 4050 Series PS"
.DoNotSetAsSysDefault = True
.Execute
Dialogs(wdDialogFilePrint).Show
.Printer = sPrinter
.DoNotSetAsSysDefault = True
.Execute
End With
End Sub
Print to a suitable available printer e.g. a colour printer
Some users have a variety of printers available (or not) at different times. You may wish to locate whether you have a suitable printer available, for example a colour printer, for a specific print task and print to that.
The following macro requires the code by Astrid Zeelenberg at Get Available Printer Names to list the available printers in an array.
You can then use this array to check whether the printer you need is available and then print to it. In the following example, I have checked to see if the array contains a printer with the word COLOR in the printer name having converted the printer names to upper case for consistency. If the routine finds such a printer name, the routine sets that printer as active printer and prints the document to it, before returning control to the original printer. If there are no printers available or no printers that match the required condition, pop up message boxes inform the user and the document is not printed.
Dim vPrinters As Variant
Dim i As Long
Dim sPrinter As String
vPrinters = ListPrinters
sPrinter = ActivePrinter
If IsBounded(vPrinters) Then
For i = LBound(vPrinters) To UBound(vPrinters)
If InStr(UCase(vPrinters(i)), "COLOR") Then
ActivePrinter = vPrinters(i)
GoTo PrintDoc
End If
Next i
MsgBox "No color printer available"
Else
MsgBox "No printers found"
End If
Exit Sub
PrintDoc:
ActiveDocument.PrintOut
ActivePrinter = sPrinter
End Sub
Use a different printer for envelopes and labels, when using the envelope/label wizard
Some users may wish to employ separate printers or trays for printing envelopes and labels. When using an envelope printer - here shown as the HP LaserJet 4050 Series PS - it is probably best to use envelope templates and the techniques already shown to print envelopes.
(There are automated envelope samples available from the downloads page of this site.) It is also possible to intercept calls to the envelope and label wizard, as shown below. In this example, the printer and tray options are set for both envelopes and labels. The default printer is recalled for other documents
If the wizard is used to add an envelope to a document, the envelope printer will no longer be applied.
Word 2007/2010
Word 2007/2010 have separate tools for envelope and labels on the Mailings tab, so requires a separate macro for each. If you only wish to change the printer setup for one of the functions then simply create only the macro you require.
Dim sCurrentPrinter As String
Dim sTray As Long
Dim oDlg As Dialog
Dim sQuery As String
sCurrentPrinter = ActivePrinter 'Save the current printer
sTray = Options.DefaultTrayID 'Save the current tray
ActivePrinter = "HP
LaserJet 4050 Series PS" 'Set the required envelope printer
Options.DefaultTrayID = 261 'Set tray used for envelopes
Set oDlg = Dialogs(wdDialogToolsCreateEnvelope)
With oDlg 'Pop up the envelopes dialog
.extractaddress = True
.Show
End With
ActivePrinter = sCurrentPrinter 'Restore the original printer
Options.DefaultTrayID = sTray 'Restore the original tray
End Sub
Dim sCurrentPrinter As String
Dim sTray As Long
Dim oDlg As Dialog
Dim sQuery As String
sCurrentPrinter = ActivePrinter 'Save the current printer
sTray = Options.DefaultTrayID 'Save the current tray
ActivePrinter = "HP
LaserJet 4050 Series PS" 'Set the required label printer
Options.DefaultTrayID = 260
'Set tray used for labels
Set oDlg = Dialogs(wdDialogToolsCreateLabels)
With oDlg 'Pop up the envelopes dialog
.extractaddress = True
.Show
End With
ActivePrinter = sCurrentPrinter 'Restore the original printer
Options.DefaultTrayID = sTray 'Restore the original tray
End Sub
Word 2000/3
Although earlier Word versions had access to the same envelope and label dialogs, they were called from the same menu entry, and while it should be possible to separate them, it doesn't seem worth the effort, so the following macro pops up a dialog to allow the user to choose envelopes or labels before setting the appropriate printer and displaying the correct dialog.
Dim sCurrentPrinter As String
Dim oDlg As Dialog
Dim sTray As Long
Dim sQuery As String
sCurrentPrinter = ActivePrinter 'Save the current printer
sTray = Options.DefaultTrayID 'Save the current tray
'Ask the user whether labels or envelopes are required
sQuery = MsgBox("Print Envelopes?", vbYesNo, "Envelopes & Labels")
If sQuery = vbYes Then 'Answer is print envelopes
ActivePrinter = "HP LaserJet 4050 Series PS"
'Set the required envelope printer
Options.DefaultTrayID = 261 'Set tray used for envelopes
Set oDlg = Dialogs(wdDialogToolsCreateEnvelope)
With oDlg 'Pop up the envelopes dialog
.extractaddress = True
.Show
End With
End If
If sQuery = vbNo Then
'Answer is print labels
ActivePrinter = "HP LaserJet 4050 Series PS"
'Set the required label printer
Options.DefaultTrayID = 260 'Set tray used for labels
Set oDlg = Dialogs(wdDialogToolsCreateLabels)
With oDlg 'Pop up the envelopes dialog
.extractaddress = True
.Show
End With
End If
ActivePrinter = sCurrentPrinter 'Restore the original printer
Options.DefaultTrayID = sTray 'Restore the original tray
End Sub
If you do not know how to employ the macro code, see the tutorial elsewhere on this site.
Windows Fax
The Windows Fax driver used in the above example is not installed by default with Windows, but may be added if required:
The following illustrations are for Windows XP. Windows Vista provides fax software in only certain business orientated versions. For other versions, you would have to consider upgrading or applying third party software in order to provide fax functionality from Word..
From The Windows Start menu - select Control Panel then Add or Remove Programs
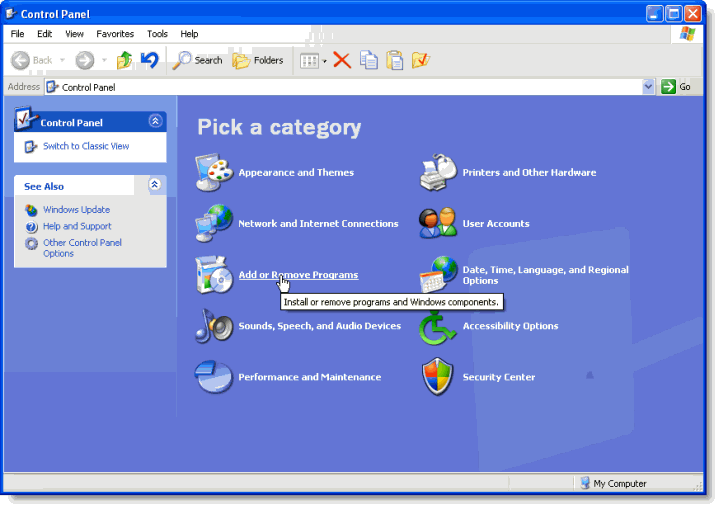
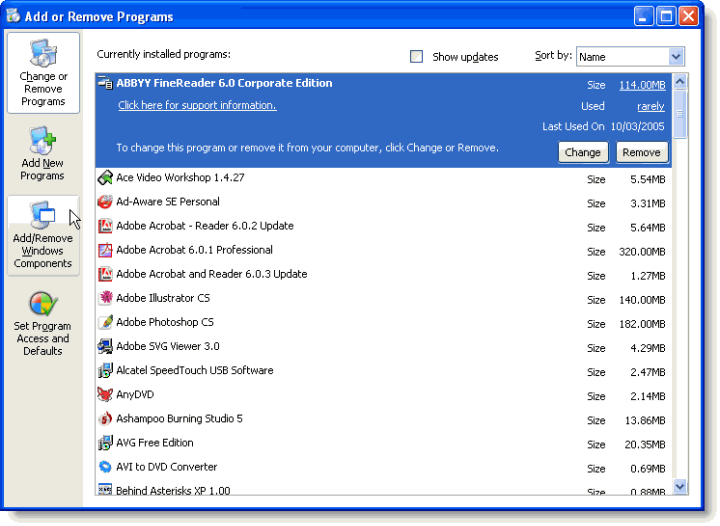
Select Add/remove Windows Components
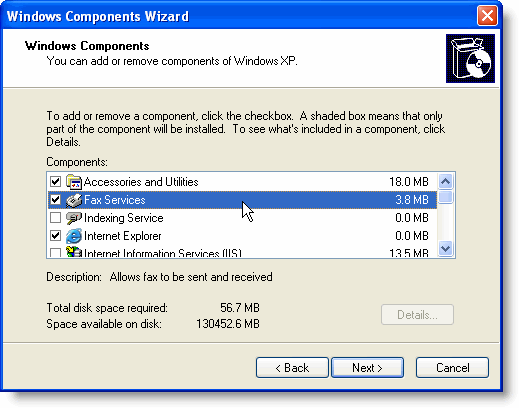
Check the Fax Services item and click 'Next' to install.
This adds the fax driver to the 'Printers' group

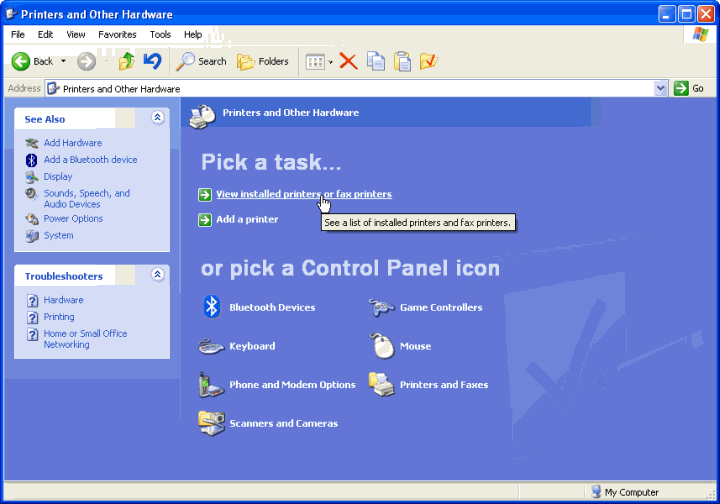
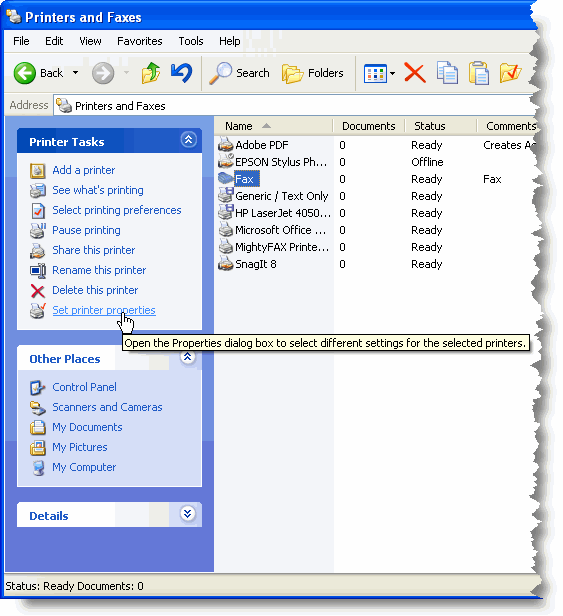
Select Printers and Other Hardware from Control Panel then View installed printers or fax printers.
Select Fax and then Set printer properties
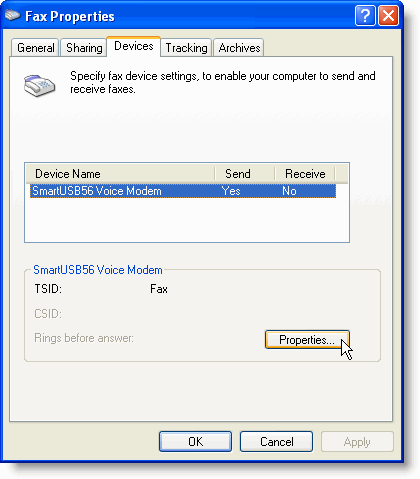
Choose your modem and set its properties to your requirements.
Home | What's New | Word Pages | Links | Downloads | Photo Gallery | Search | Contact
Print to a specific printer
Despite the URL of this page, faxing from Word plays only a cameo role at the end of the page. Instead the page concentrates on printing to different printers and trays.