Graham Mayor
... helping to ease the lives of Microsoft Word users.
 |
 |
 |
Many people access the material from this web site daily. Most just take what they want and run. That's OK, provided they are not selling on the material as their own; however if your productivity gains from the material you have used, a donation from the money you have saved would help to ensure the continued availability of this resource. Click the appropriate button above to access PayPal.
Create a Simple User Form
Userforms called from macros are an elegant way of collecting data from the user to be presented in a document. They have many uses in Word documents and templates - and some more advanced examples can be seen in the various add-ins available elsewhere on this web site e.g. in the variables editor add-in, and the invoice template both of which make much use of interconnected userforms.
In this example I have used throughout the default names and settings that the userform tools provide. In a real world example you would change the default names for more meaningful names.
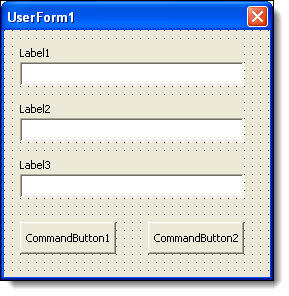
The form in question is illustrated in the first picture below:
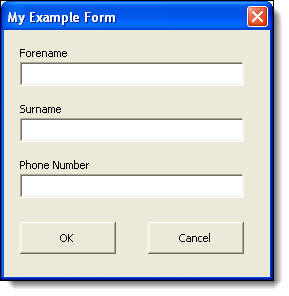
This form uses three text boxes and a pair of command buttons, to collect three pieces of data. This is a simple application that could be used with a letterhead, memo or fax message for example. It could be made more sophisticated by using list boxes, combo boxes (list boxes with the ability to add extra data where the list does not contain a suitable value), date pickers, check boxes and a whole raft of other stuff that you could include, once you understand the basic concepts.
This page may be read in conjunction with the guide to installing macros.
For more advanced reading on the subject, I would refer you to the web site of my friend and frequent collaborator. Greg Maxey
The examples below demonstrate how to populate the document with the values from the userform using content controls, document variables or bookmarks.
Content Controls
Introduced in Word 2007 and improved in later versions, Content Controls are the best and most robust way to present variable data in a document. To make things easier I have created an add-in that will insert content controls and provide a raft of content control editing functions.
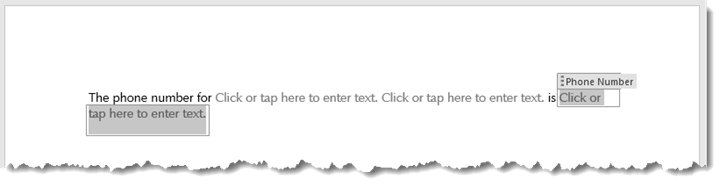
Insert three rich text content controls to take the data. In the illustration below, they are titled Forename, Surname and Phone Number and here show their default placeholder texts.
Document variables
Start by choosing the names of the three variables that will represent the values of Forename, Surname and Phone Number. For the sake of simplicity I have used var1, var2 & var3.
Insert docvariable fields in the document to place the results of those fields. The simplest method is to type CTRL+9, which will insert the field brackets { } and type DocVariable variablename between the brackets as shown in the following example:
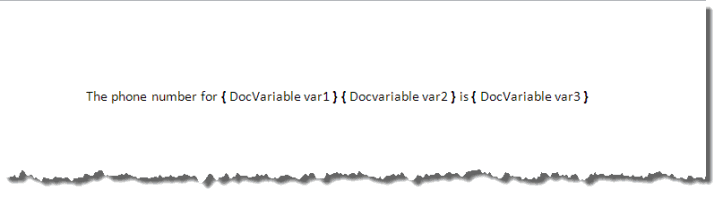
Toggle the field codes with ALT+F9 to hide the fields. As the variables don't yet exist, don't update the fields for the moment, or you will see error messages at the field positions. The result will be as follows:

Bookmarks
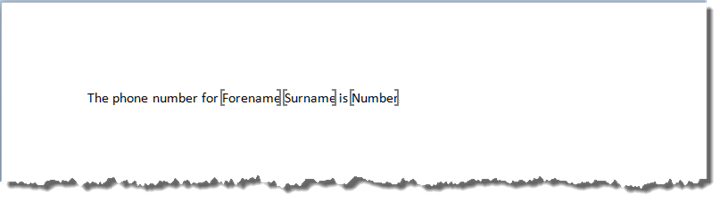
Bookmarks are more easily accidentally overwritten than docvariable fields, but they are just as easy to populate if you are more comfortable using them. In this example we will call the bookmarks bm1, bm2 and bm3 and they can be placed just like the docvariable fields. The illustration below shows the bookmark locations with optional place marking text.
Creating the userform
Start by opening the vba editor. How you do this depends on the Word version, but ALT+F11 works in all versions. The vba editor looks essentially the same in all Word versions (and other Office apps. for that matter, but we will concentrate on Word).
Start by selecting in which of the open templates or documents you wish to store the user form. Only templates opened in Word can be accessed, although templates loaded as add-ins will also appear in the project list.

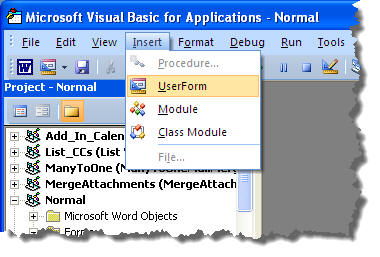
From the 'Insert' menu of the vba editor, select UserForm and a new blank form will open in the currently selected project (by default the normal template).
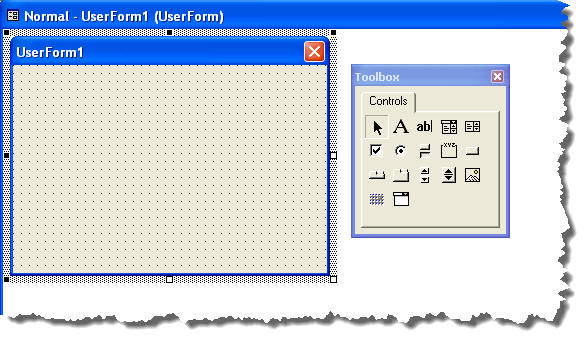
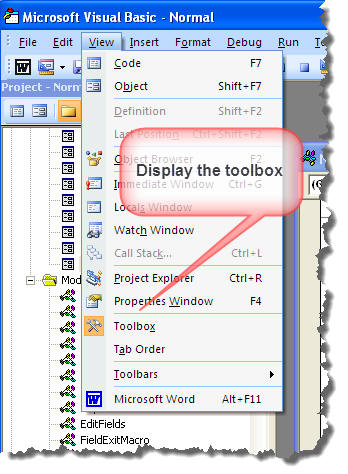
The toolbox may not be present and will not be placed alongside the form, where I have shown it for convenience. If the toolbox is not visible, check it in the View menu:
Add the tools you require from the toolbox by dragging them to the userform area and dropping them. As indicated, we want three text boxes and two command buttons. We also need three labels to describe the text boxes as a user aid to completing the form. Adjust the shape and size of the form and its content to taste.
It is possible to modify all aspects of the form and its elements using the properties window. Alongside the form I have shown part of the properties window for TextBox1. However we will stick with the default settings for this exercise.

Programming the form
The form is now complete. What remains is to program it to interface with the document. Right click the form and select View Code - or press F7. A module related to the form will open.
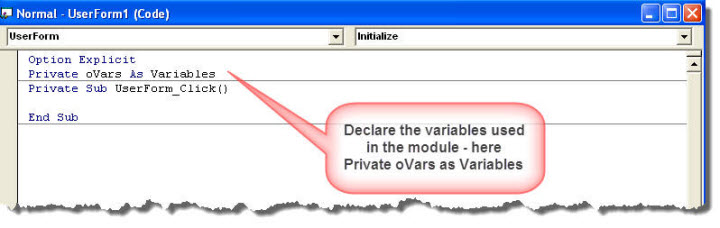
Note that the module has Option Explicit at the top. This forces the programmer to declare the variables used in the macros and is most desirable. It is not present by default, but will be if you choose Tools > Options > Editor > Require Variable Declaration from the vba editor:
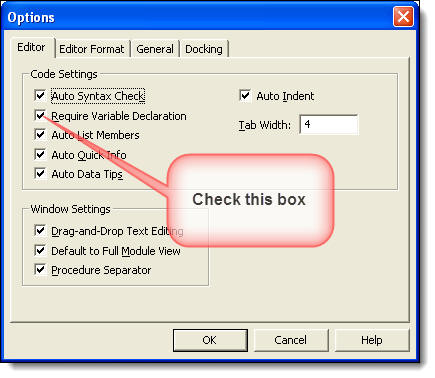
Having set the option to declare the variables, you will now have to declare them of you will get an error when the macro is run. There is only one variable used in this example.
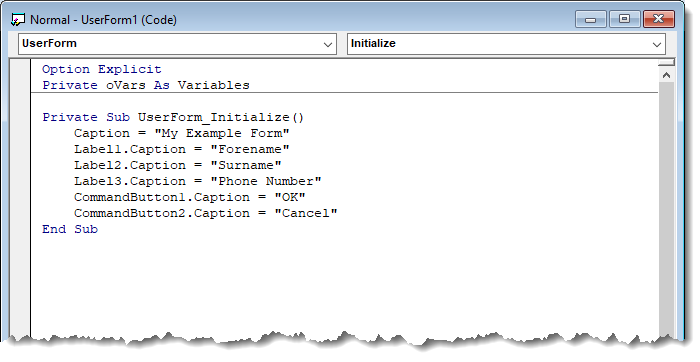
Click the panel top right of the module to display the dropdown list of options and select initialize
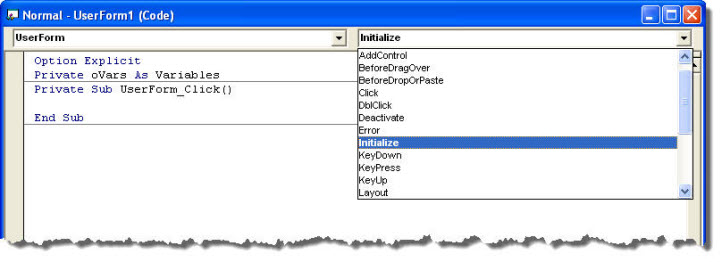
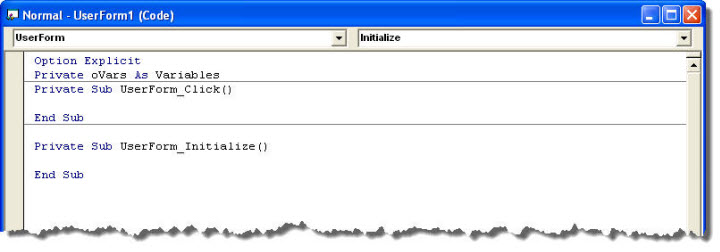
This adds a macro to the module (UserForm_Click will not be used and can be deleted later). This macro sets up the initial settings of the userform when it is displayed and here we will use it to provide the text for the various labels. Note that 'Me' is an abbreviation for the current userform. The following is the code that will go in the newly created macro as shown below.
Caption = "My Example Form"
Label1.Caption = "Forename"
Label2.Caption = "Surname"
Label3.Caption = "Phone Number"
CommandButton1.Caption = "OK"
CommandButton2.Caption = "Cancel"
End Sub
The Private Sub UserForm_Click is superfluous and can be deleted.
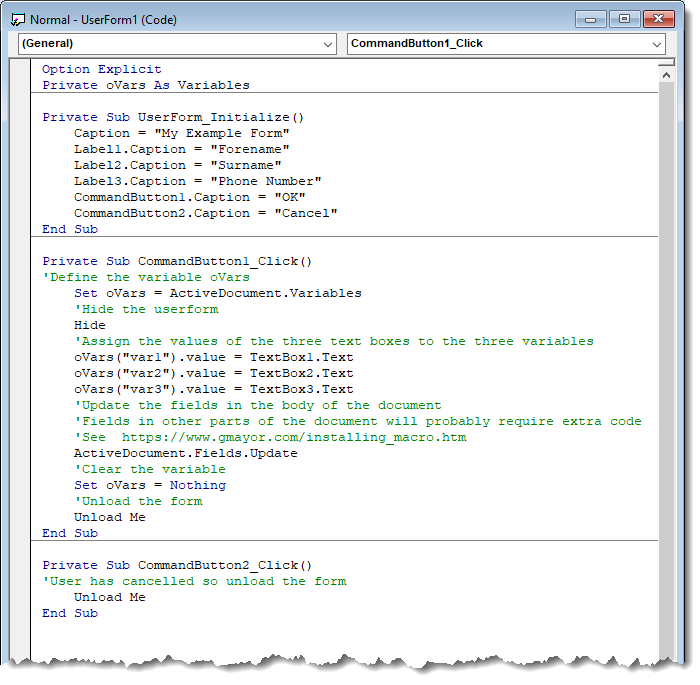
We can now add macros to the two command buttons.
CommandButton1 will be used to transfer the values of the text boxes to the document variables and CommandButton2 will be used to quit.
'Define the variable oVars
Set oVars = ActiveDocument.Variables
'Hide the userform
Hide
'Assign the values of the three text boxes to the three variables
oVars("var1").Value = TextBox1.Value
oVars("var2").Value = TextBox2.Value
oVars("var3").Value = TextBox3.Value
'Update the fields in the body of the document
'Fields in other parts of the document will probably require extra code
'See https://www.gmayor.com/installing_macro.htm
ActiveDocument.Fields.Update
'Clear the variable
Set oVars = Nothing
'Unload the form
Unload Me
End Sub
Private Sub CommandButton2_Click()
'User has cancelled so unload the form
Unload Me
End Sub
That completes the userform programming. All we need now is to call the form from the document/template. This is done from a simple macro in a project module.
Sub ShowMyForm()
UserForm1.Show
Unload UserForm1
End Sub
If you want the form to display automatically when you create new documents from the template, create an autonew macro
in the template to call the above macro e.g.
ShowMyForm
End Sub

Click OK and the fields in the document are filled with the values from the form:

Bookmarks
The above example uses the docvariable method. Programming bookmarks is arguably even simpler:
We don't need to declare oVars as Variables, because we are not using any variables. The Initialization string remains the same, so all we have now to consider is how to populate the bookmarks, and to facilitate that I have produced a simple function called FillBM.
Although available from the link, I have repeated it below
Dim oRng As Range
With ActiveDocument
On Error GoTo lbl_Exit
Set oRng = .Bookmarks(strBMName).Range
oRng.Text = strValue
oRng.Bookmarks.Add strBMName
End With
lbl_Exit:
Exit Sub
End Sub
This code goes in the the same module as Sub ShowMyForm() which calls the userform.
The function is called for each bookmark from the CommandButton1_Click macro, which replaces the similarly named macro listed previously for docvariables
'Hide the userform
Me.Hide
'Assign the values of the three text boxes to the three bookmarks
'Using the Function FillBM
FillBM "bm1", Me.TextBox1.Text
FillBM "bm2", Me.TextBox2.Text
FillBM "bm3", Me.TextBox3.Text
'Unload the form
Unload Me
End Sub
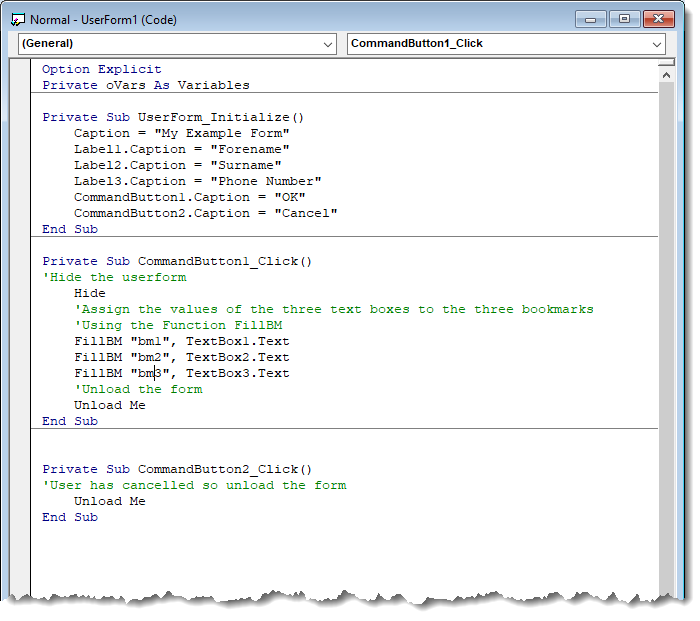
The result is just the same. The bookmarks are filled with the values and the bookmarks restored to encompass those values:
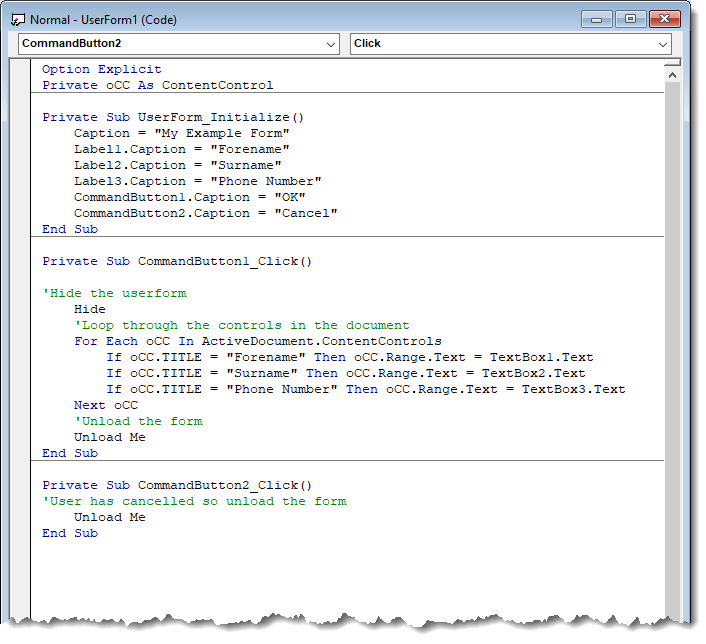
Content Controls
The code to fill content controls is a little more complicated. Essentially you select the content control that you want to complete and fill its range with the required value e.g.
Private oCC As ContentControl
Private Sub UserForm_Initialize()
Caption = "My Example Form"
Label1.Caption = "Forename"
Label2.Caption = "Surname"
Label3.Caption = "Phone Number"
CommandButton1.Caption = "OK"
CommandButton2.Caption = "Cancel"
End Sub
Private Sub CommandButton1_Click()
'Hide the userform
Hide
'Loop through the controls in the document
For Each oCC In ActiveDocument.ContentControls
If oCC.TITLE = "Forename" Then oCC.Range.Text = TextBox1.Text
If oCC.TITLE = "Surname" Then oCC.Range.Text = TextBox2.Text
If oCC.TITLE = "Phone Number" Then oCC.Range.Text = TextBox3.Text
Next oCC
'Unload the form
Unload Me
End Sub
Private Sub CommandButton2_Click()
'User has cancelled so unload the form
Unload Me
End Sub
Taking it a small step further
While working on this page, I thought it might be interesting to show how to read the values into the text boxes on the form from the variables. This requires a few more lines of code in the Private Sub UserForm_Initialize() routine. The on error line traps the error that will occur if there are no variables in the document
Set oVars = ActiveDocument.Variables
Caption = "My Example Form"
Label1.Caption = "Forename"
Label2.Caption = "Surname"
Label3.Caption = "Phone Number"
CommandButton1.Caption = "OK"
CommandButton2.Caption = "Cancel"
On Error Resume Next
'Read the values from the document variables if they exist
TextBox1.value = oVars("var1").value
TextBox2.value = oVars("var2").value
TextBox3.value = oVars("var3").value
End Sub
Similarly using Bookmarks, you can read the content of the bookmarks into the text boxes.
Caption = "My Example Form"
Label1.Caption = "Forename"
Label2.Caption = "Surname"
Label3.Caption = "Phone Number"
CommandButton1.Caption = "OK"
CommandButton2.Caption = "Cancel"
For Each oBm In ActiveDocument.Bookmarks
If oBm.Name = "bm1" Then
TextBox1.Text = oBm.Range.Text
End If
If oBm.Name = "bm2" Then
TextBox2.Text = oBm.Range.Text
End If
If oBm.Name = "bm3" Then
TextBox3.Text = oBm.Range.Text
End If
Next oBm
End Sub
Using Content Controls, which are a little more complicated again, the same macro could be coded as follows. Note the additional lines to ignore control when it is showing its placeholder text, so that the fields in the form are not filled with placeholder texts.
Caption = "My Example Form"
Label1.Caption = "Forename"
Label2.Caption = "Surname"
Label3.Caption = "Phone Number"
CommandButton1.Caption = "OK"
CommandButton2.Caption = "Cancel"
For Each oCC In ActiveDocument.ContentControls
If oCC.TITLE = "Forename" Then
If oCC.ShowingPlaceholderText = False Then
TextBox1.Text = oCC.Range.Text
End If
End If
If oCC.TITLE = "Surname" Then
If oCC.ShowingPlaceholderText = False Then
TextBox2.Text = oCC.Range.Text
End If
End If
If oCC.TITLE = "Phone Number" Then
If oCC.ShowingPlaceholderText = False Then
TextBox3.Text = oCC.Range.Text
End If
End If
Next oCC
End Sub
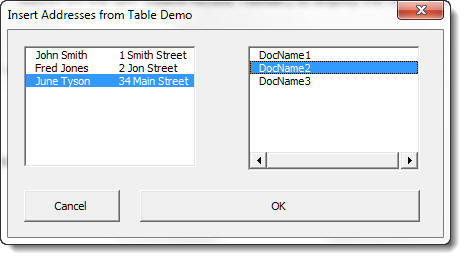
List Boxes
To view an example of populating a Combo Box from data in a table, click this link.
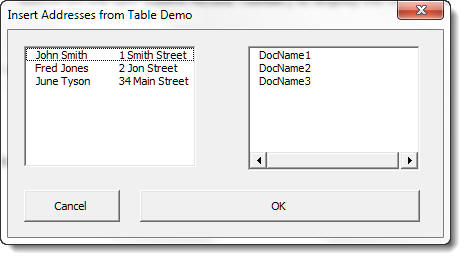
The examples so far, use only simple text boxes, but as you can see from any of the add-ins featured on this site, this only brushes the surface of what you can do with userforms. One thing that is often required is the selection from a pre-prepared list of items. To help with this I have prepared a simple template containing a userform with a pair of multi-column list boxes.
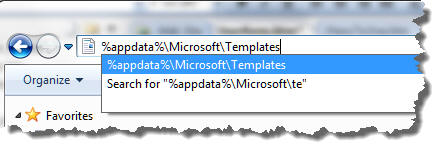
The template and table document are supplied (link at the bottom of the section) in a zipped format. Extract the template and the document to the Word user templates folder. This is the same folder that contains the normal template and is easily located by right clicking the address bar of Windows Explorer and select 'Edit Address' then enter %appdata%\Microsoft\Templates and press the enter key.
With the template and the table document in place, create a new document from the template.
The list boxes are each populated from the document which contains two tables that contain the list items. The tables have four and two columns respectively, but either could have more or fewer columns and the code will still work. The template displays the first two columns of the first table in the first list box, but uses all the columns in the document; and the first column of the second table in the second list box, but only uses the second column values in the document. The values can of course be whatever you want to list.
Create a new document to see how it works in practice. Open the template and examine the code associated with the userform to see how it is put together.
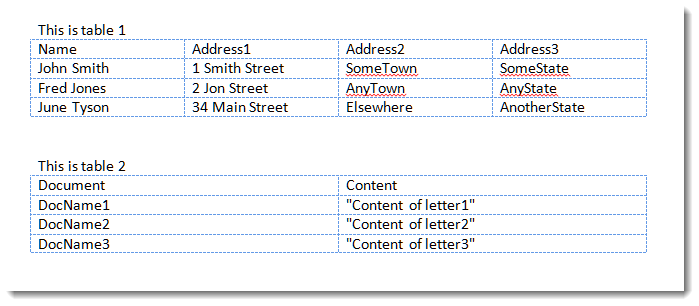
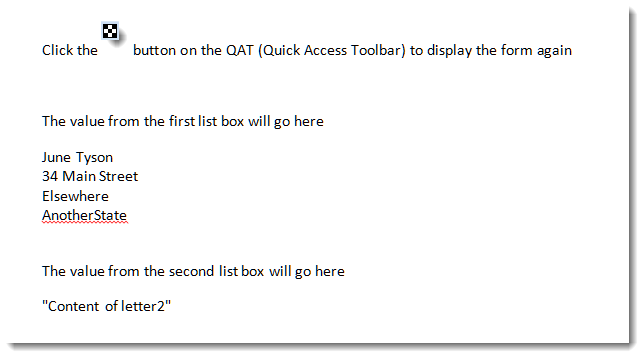
In the above example it is the content from the data table that is inserted. The data table can, however be used to hold filenames or paths and filenames of documents or graphics.
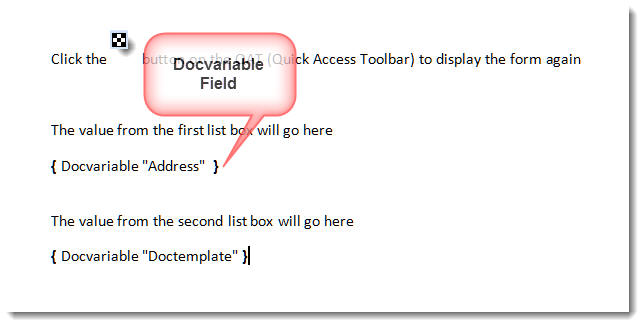
For example in the final illustration above, Table 2 produces the value of "Content of letter2" in the docvariable. Had that been (say) "Filename2.jpg" or "Filename2.docx" then it would have been possible to insert the image or the document using INCLUDEPICTURE or INCLUDETEXT fields e.g.{ INCLUDEPICTURE "C:\\My Pictures\\{ Docvariable "Doctemplate" } }.
It would also be possible to insert Autotext entries using AUTOTEXT fields in conjunction with the DOCVARIABLE fields from named autotext entries in the data table e.g. { AUTOTEXT { Docvariable "Doctemplate" } }
See also https://www.gmayor.com/SelectFile.htm which follows a similar theme.
I won't bother listing the code as you can examine it directly in the template, but in essence it follows the approach used earlier on this page to populate document variables the contents of which are displayed by docvariable fields. The code itself is annotated throughout with descriptions of what each part does.
All the userform code employs the default element names. It is good practice, in a real
world situation, to change the default names for more meaningful names. This also aids programming,
so you don't have to keep referring back to the form to see what TextBox12 or ListBox4 actually
refer to, when your memory is anything like mine.
 - Now download the example form.
A Simple Userform
The purpose of this web page is to provide an insight into the usefulness of such forms, by working through the preparation of a simple form example to collect data from the keyboard and insert it into a document by means of document variable fields.