Graham Mayor
... helping to ease the lives of Microsoft Word users.
 |
 |
 |
Many people access the material from this web site daily. Most just take what they want and run. That's OK, provided they are not selling on the material as their own; however if your productivity gains from the material you have used, a donation from the money you have saved would help to ensure the continued availability of this resource. Click the appropriate button above to access PayPal.
Some useful macro examples - page 1
Frequently the Word forums throw up some interesting exercises in macro programming. Some of the better examples that my fellow MVPs and I have come up with appear elsewhere in the Word pages on this site. This page offers a place to present some code examples that may have wider use, which you can adapt to your own requirements. I will add to the examples as they come up, but for the moment we will start with the InsertField dialog:
Insert Field formatting switch
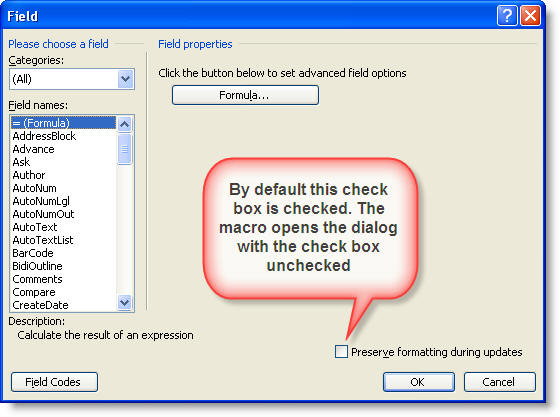
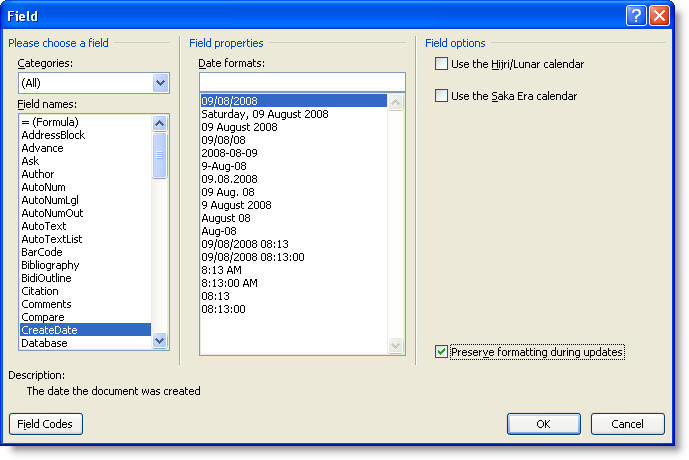
The InsertField dialog (the illustrations are from Word 2003 (top) and 2007, other Word versions are similar) has the Preserve formatting during updates check box checked by default, with no obvious way of resetting that default. This adds a MERGEFORMAT switch to the inserted field. Frankly I have never found any real use for the switch and so I always uncheck it .... when of course I remember, so the first macro I created simply intercepts the InsertFile command and uses the SendKeys command to physically uncheck the box i.e.
SendKeys "{Tab 2} +{Tab 2}"
Dialogs(wdDialogInsertField).Show
lbl_Exit:
Exit Sub
End Sub
This worked fine, until fellow MVP Paul Edstein, who uses the pseudonym Macropod in the forums, baited me to produce a version which gave the user the opportunity to add a CHARFORMAT switch as an alternative to the MERGEFORMAT switch.
Inserting a field from the Insert > Field menu option (Insert > Quick Parts > Field in Word 2007/2010) opens the dialog with the check box unchecked, using the same method as above, but if you check the box, you are presented with a message box which offers the opportunity to choose the type of formatting switch, then adds the appropriate switch to the field.
Check the box and you will see the further dialog

The result is that the field may be inserted with either switch as appropriate e.g.
{ CREATEDATE \@ "dddd, dd MMMM yyyy" \* CHARFORMAT }
by selecting YES
{ CREATEDATE \@ "dddd, dd MMMM yyyy" \* MERGEFORMAT }
by selecting No
or none if the Insert Field Dialog box is left unchecked.{ CREATEDATE \@ "dddd, dd MMMM yyyy" }
Dim oRng As Range
Dim i As Variant
Dim iSwitch As Long
Dim strChoice As String
SendKeys "{Tab 2} +{Tab 2}"
Dialogs(wdDialogInsertField).Show
On Error GoTo lbl_Exit 'User has cancelled
Set oRng = Selection.Range
oRng.Start = oRng.Start - 1
With oRng.Fields(1)
If InStr(1, .Code, "MERGEFORMAT") <> 0 Then
iSwitch = MsgBox("Use charformat in place of the mergeformat switch?", _
vbYesNo, _
"Insert Field")
If iSwitch = vbYes Then
.Code.Text = Replace(.Code.Text, _
"MERGEFORMAT", _
"CHARFORMAT")
End If
End If
.Update
End With
oRng.End = oRng.End + 1
oRng.Collapse 0
oRng.Select
lbl_Exit:
Exit Sub
End Sub
I am informed, by the aforementioned Paul Edstein, that the SendKeys approach will not work under the Windows Vista operating system, returning error code 70: "Permission denied". This then negates the use of the above macro for Vista users, but I have included a modified version below with the SendKeys line removed and a separate step to remove the switch. It is not as elegant as un-checking the check box, but it does the job.
Windows Vista Version
The following will work in other Windows versions also, but requires an extra step to overcome the SendKeys issue.
Dim oRng As Range
Dim i As Variant
Dim iSwitch As Long
Dim strChoice As String
Dialogs(wdDialogInsertField).Show
On Error GoTo lbl_Exit 'User has cancelled
Set oRng = Selection.Range
oRng.Start = oRng.Start - 1
With oRng.Fields(1)
If InStr(1, .Code, "MERGEFORMAT") <> 0 Then
iSwitch = MsgBox("Use charformat in place of the mergeformat switch?", _
vbYesNo, _
"Insert Field")
If iSwitch = vbYes Then
.Code.Text = Replace(.Code.Text, _
"MERGEFORMAT", _
"CHARFORMAT")
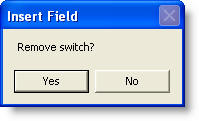
ElseIf iSwitch = vbNo Then
iSwitch = MsgBox("Remove switch?", _
vbYesNo, _
"Insert Field")
If iSwitch = vbYes Then
.Code.Text = Replace(.Code.Text, _
" \* MERGEFORMAT ", _
"")
End If
End If
End If
.Update
End With
oRng.End = oRng.End + 1
oRng.Collapse 0
oRng.Select
lbl_Exit:
Exit Sub
End Sub
The Vista version of the macro has two message boxes. One of them is identical to the previous version, the other is displayed when the user responds to the first box with 'No'
Number documents
There is a page on this site dedicated to numbering documents but on a number of occasions I have been asked for a variation of this to place an incrementing number at a bookmarked location in a series of documents. The example used here was created to print a batch of numbered receipts, and includes a second macro to reset the stored start number.
The macro uses a bookmark in the document template named RecNo
Sub AddNoFromINIFileToBookmark()
Dim SettingsFile As String
Dim Order As String
Dim rRecNo As Range
Dim strCount As String
Dim i As Long
On Error GoTo err_Handler
strCount = InputBox("Print how many copies?", _
"Print Numbered Copies", 1)
If strCount = "" Then GoTo lbl_Exit
SettingsFile = Options.DefaultFilePath(wdStartupPath) & "\Settings.ini"
Order = System.PrivateProfileString(SettingsFile, "DocNumber", "Order")
If Order = "" Then
Order = 1
End If
For i = 1 To Val(strCount)
With ActiveDocument
Set rRecNo = .Bookmarks("RecNo").Range
FillBM "RecNo", Format(Order, "00000")
.Fields.Update
.ActiveWindow.View.ShowFieldCodes = False
.PrintOut
End With
Order = Order + 1
Next i
System.PrivateProfileString(SettingsFile, "DocNumber", "Order") = Order
lbl_Exit:
Exit Sub
err_Handler:
If Err.Number = 5941 Then
MsgBox "The bookmark 'RecNo' is not in the current document."
End If
GoTo lbl_Exit
End Sub
Sub ResetStartNo()
Dim SettingsFile As String
Dim Order As String
Dim sQuery As String
SettingsFile = Options.DefaultFilePath(wdStartupPath) & "\Settings.ini"
Order = System.PrivateProfileString(SettingsFile, "DocNumber", "Order")
sQuery = InputBox("Reset start number?", "Reset", Order)
If sQuery = "" Then Exit Sub
Order = sQuery
System.PrivateProfileString(SettingsFile, "DocNumber", "Order") = Order
lbl_Exit:
Exit Sub
End Sub
Instead of printing a batch of similar numbered documents, the following variation simply adds the incremented number to each new document created from the template at the bookmarked location named RecNo. The reset macro above will reset this version equally as the following uses the same stored number data.
Sub AutoNew()
Dim SettingsFile As String
Dim Order As String
Dim rRecNo As Range
On Error GoTo err_Handler
SettingsFile = Options.DefaultFilePath(wdStartupPath) & "\Settings.ini"
Order = System.PrivateProfileString(SettingsFile, "DocNumber", "Order")
If Order = "" Then
Order = 1
End If
Set rRecNo = ActiveDocument.Bookmarks("RecNo").Range
FillBM "RecNo", Format(Order, "00000")
Order = Order + 1
System.PrivateProfileString(SettingsFile, "DocNumber", "Order") = Order
lbl_Exit:
Exit Sub
err_Handler:
If Err.Number = 5941 Then
MsgBox "The bookmark 'RecNo' is not in the current document."
End If
GoTo lbl_Exit
End Sub
The two previous macros use the following sub to fill the bookmark with the value. This sub may be used to fill any named bookmark with a supplied value.
Dim oRng As Range
With ActiveDocument
On Error GoTo lbl_Exit
Set oRng = .Bookmarks(strBMName).Range
oRng.Text = strValue
oRng.Bookmarks.Add strBMName
End With
lbl_Exit:
Exit Sub
End Sub
Paste unformatted text
If you paste text from the internet for example, the paste will bring across all the formatting of the web page, whereas users frequently require the pasted text to adopt the formatting of the document into which it is pasted. This can be achieved with Paste Special > Unformatted text, but the macro recorder will not accurately record that action so....
On Error GoTo err_Handler
Selection.PasteSpecial _
DataType:=wdPasteText, _
Placement:=wdInLine
lbl_Exit:
Exit Sub
err_Handler:
Beep
GoTo lbl_Exit
End Sub
Copy footnotes c/w formatting to a new document
Dim oSourceDoc As Document
Dim oTargetDoc As Document
Dim strID As String
Dim i As Long
Dim oFNote As Range
Dim oRng As Range
Set oSourceDoc = ActiveDocument
Set oTargetDoc = Documents.Add
For i = 1 To oSourceDoc.Footnotes.Count
strID = oSourceDoc.Footnotes(i).Index
Set oFNote = oSourceDoc.Footnotes(i).Range
Set oRng = oTargetDoc.Range
oRng.Collapse 0
With oRng
.Collapse 0
.Text = strID & Chr(32)
.Style = "Footnote Text"
.Font.Superscript = True
.Collapse 0
.Font.Superscript = False
.FormattedText = oFNote.FormattedText
End With
Next i
lbl_Exit:
Exit Sub
End Sub
Send the current document from Word by e-mail as an attachment, with the message body and header details pre-completed, e.g. for the return of a completed form document.
Sub Send_As_Mail_Attachment()
' Send the document as an attachment
' in an Outlook Email message
Dim oOutlookApp As Object
Dim olInsp As Object
Dim wdDoc As Object
Dim oRng As Object
Dim oItem As Object
Const strTo As String = "someone@somewhere.com"
Const strSubject As String = "This is the subject"
Const strMsg As String = "This is the message body. Default signature will be retained."
On Error Resume Next
'Prompt the user to save the document
ActiveDocument.Save
'Get Outlook if it's running
Set oOutlookApp = GetObject(, "Outlook.Application")
'Outlook wasn't running, start it from code
If Err <> 0 Then
Set oOutlookApp = CreateObject("Outlook.Application")
End If
On Error GoTo err_Handler
'Create a new mailitem
Set oItem = oOutlookApp.CreateItem(0)
With oItem
.to = strTo
.Subject = strSubject
.Attachments.Add ActiveDocument.FullName
.BodyFormat = 2 'html format
Set olInsp = .GetInspector
Set wdDoc = olInsp.WordEditor 'The message body editor
Set oRng = wdDoc.Range(0, 0) 'The start of the message body
oRng.Text = strMsg 'The accompanying message text
.Display 'This line must be retained
'.Send 'Remove leading apostrophe after testing
End With
'Clean up
Set oItem = Nothing
Set olInsp = Nothing
Set wdDoc = Nothing
Set oRng = Nothing
Set oOutlookApp = Nothing
lbl_Exit:
Exit Sub
err_Handler:
GoTo lbl_Exit
End Sub
Toggle the SQL security entry in the registry through vba
You receive the "Opening this will run the following SQL command" message when you open a Word mail merge main document that is linked to a data source - https://support.microsoft.com/en-us/help/825765
This linked page explains how to create registry entries to turn off the security message. Some users have been concerned about the security implications of turning off this warning message. The following code was conceived with that issue in mind. The macro creates the registry entry if it is not present and then toggles the setting between 0 and 1 each time the macro is run. It could therefore be adapted for use in a mail merge macro to switch off the warning while the particular merge was run, then switch it back on again on completion.
Sub ToggleSQLSecurity()
Dim WSHShell As Object
Dim RegKey As String
Dim rKeyWord As String
Dim wVer As String
If Val(Application.Version) < 10 Then
'The security issue relates to
'Word versions from 10.0 (Word 2002)
MsgBox "This macro is for Word 2002 and later!", vbOKOnly, "Wrong Word Version"
Exit Sub
End If
wVer = Val(Application.Version) & ".0"
Set WSHShell = CreateObject("WScript.Shell")
Start:
RegKey = "HKEY_CURRENT_USER\Software\Microsoft\Office\" & wVer & "\Word\Options\"
On Error Resume Next
'The registry key does not exist
rKeyWord = WSHShell.RegRead(RegKey & "SQLSecurityCheck")
If rKeyWord = "" Then
WSHShell.regwrite RegKey & "SQLSecurityCheck", 1, "REG_DWORD" 'set it at zero
GoTo Start: 'and read it again
End If
If rKeyWord = 1 Then
WSHShell.regwrite RegKey & "SQLSecurityCheck", 0, "REG_DWORD"
MsgBox "SQL Security checking is switched off", vbInformation, "SQL Check"
Else
WSHShell.regwrite RegKey & "SQLSecurityCheck", 1, "REG_DWORD"
MsgBox "SQL Security checking is switched on", vbInformation, "SQL Check"
End If
lbl_Exit:
Exit Sub
End Sub
Click the links below for more Word macros
Macros list page 1
This page
- Insert Field formatting switch
- Number documents
- Paste unformatted text
- Copy footnotes c/w formatting to a new document
- Send the current document from Word by e-mail as an attachment, with the header details pre-completed, e.g. for the return of a completed form document.
- Toggle the SQL security entry in the registry through vba
Page 2
- True title case
- Extract acronyms to a new document
- Format part of a found text string
- Format part of a found text string in a list of items
- Add a row to a table in a protected form
Page 3
- Create a bar chart based on the content of a dropdown form field
- Repeat a block of formatted text and form fields based upon the content of another form field
- Colour a form field check box with a contrasting colour when it is checked.
- Count times entered into a document
- Transpose Characters
- Insert Autotext Entry with VBA
- Insert Building Blocks with VBA
Page 4
- Replace a list of words from an array
- Replace a list of words from a table
- Replace a list of words from a table and offer a choice of replacements
- Add tabs to centre of text area and right margin
- Extract e-mail addresses from a document to a list
- Fix scrambled view of some open type fonts in Word 2010
- Word 2010 Print Preview
Useful Functions
- BrowseforFile
- Browse for Folder
- FileExists
- FolderExists
- CleanFileName
- FileNameUnique
- FolderNameUnique
- CreateFolders
- UpdateTemplate
- ExtractDigits - from text string
- FillBM
- ImageToBM
- IsInteger
- Validate Userform TextBox